
Before you read any further: please also check Azure’s Azure VM Image Builder service!
Today (in September 2016, that is), the Microsoft Cloud for Germany goes live (or as Microsoft calls it, becomes Generally Available). For me personally, having many customers with ‘non-Microsoft’-Workloads, it is a pleasure to see that Azure Germany is as open as the the existing International data centers. Customers such as TeamDrive, platform.sh or G DATA use our German data centers for their critical workloads, alongside with the pretty interesting Data Trustee Model, which Microsoft and Deutsche Telekom established for Frankfurt and Magdeburg regions.
I wanted to take the opportunity to show how both Microsoft Azure Cloud for Germany, as well as worldwide, provide an open platform and support the open source ecosystem. In the previous article, I described how you can create a service principal in Azure Active Directory (incl. Azure in Germany). In this article, we will explore how to use Hashicorp’s open-source packer toolchain to automatically create custom VM images, both for Windows- and Linux-VMs.
Before we dig into the details, let’s first explore which options we have to get software packages installed on a VM in the cloud:
How to install software on a VM in the cloud?
Manual installation
The easiest, ad-hoc approach is to just spin off a Windows/Linux VM, then RDP/ssh into the box, copy the bits over, and click sudo start setup.exe and the like. Clearly, that’s a low barrier of entry, but is totally error-prone, non-repeatable and labor intense. When new versions of the software get released, patches are rolled out, etc., somebody must invest time to build a new “golden master” VM image.
Configuration Management Systems: Chef, Puppet, Ansible & Saltstack
Configuration Management Tools such as puppet, Chef, Ansible, Salt Stack or Powershell Desired State Configuration provide a great story for managing large fleets of VMs in the cloud, preventing configuration drift, applying changes to large sets of machines, etc.
Often though, these tools need some sort of central server running somewhere, like a ‘DSC pull server’ or a ‘Chef server’ to host and run the runbooks, recipies, and what have you.
Custom Script Extension
For simple cases of automating software installation, Azure supports the custom script extension. This extension allows an ARM-based VM deployment to refer to a shell script, and additional assets, which upon deployment time are downloaded onto the VM, and executed.
The following example ensures that a .sh-script and an .tar.gz-archive are downloaded to the VM, and the script is executed using the BASH shell:
{
    "$schema": "https://schema.management.azure.com/schemas/2015-01-01/deploymentTemplate.json#",
    ...,
    "resources": [
        {
            "type": "Microsoft.Compute/virtualMachineScaleSets",
            ...,
            "properties": {
                "virtualMachineProfile": {
                    "extensionProfile": {
                        "extensions": [
                            {
                                "name": "CustomScriptExtensionVMSS",
                                "properties": {
                                    "publisher": "Microsoft.OSTCExtensions",
                                    "type": "CustomScriptForLinux",
                                    "typeHandlerVersion": "1.4",
                                    "autoUpgradeMinorVersion": false,
                                    "settings": {
                                        "fileUris": [
                                            "https://raw.githubusercontent.com/chgeuer/repo/master/scripts/install-stuff.sh",
                                            "https://bits.blob.core.windows.net/software/mypackage.tar.gz",
                                        ],
                                        "commandToExecute": "bash install-stuff.sh mypackage.tar.gz"
                                    }
                                }
                            }
                        ]
                    }
                }
            }
        }
    ]
}
The previous example lists directly downloadable resources. Using “Shared Access Signatures” to control access to blobs in Azure Storage, with ARM template parameters, and the ARM [concat()] function, you can also ensure that confidential assets are not plain on the Internets (as I do here for illustration purposes).
The largest disadvantage of the custom script extension is the impact on runtime performance, respectively deployment latency: When you deploy a set of VMs using an ARM template, assuming each of these machines need to download and install a reasonably complect software package, it can take quite a while until all machines are ready to rock.
packer
Hashicorp’s open-source packer tool is an executable which can be launched on a local machine (such as a developer’s laptop, or a build server). packer spins up a VM in one or more data centers (and one or more clouds for that matter). Once the VMs are up and running, packer connects to the VM (using Powershell WinRM for Windows VMs, or ssh for Linux VMs), and does whatever you want it to do. Most important, you can let packer upload files, and run commands on the remote machine. At the end of all tasks on the VM, packer runs sysprep and shuts down the VM, resulting in a ‘golden image’ you can then use to fire off readily installed VMs.
Compared to the custom script extension, packer shifts waiting time away from the actual VM provisioning: Whenever the software department releases a new version, the build server can connect to all deployment environments (cloud vendors and data centers), and create the latest and greatest image. So longer “compile/build time”, much faster “deploy/startup time”.
Provisioning a Windows VM
In this article, we’ll dig into provisioning a Windows and a Linux VM in Azure Germany.
![packer interactions with Azure provisining a Windows VM][windowsflow]
But before we can see all this happening, we need to do a bit of homework:
Install packer
packer is a stand-alone compiled binary, implemented in Go. You can grab compiled Mac OS X/Linux/Windows binaries from the packer downloads page, or you compile it yourself.
Building packer from scratch (on Windows)
If you’re running on Windows, first install Go from the downloads page. I used the go1.7.1.windows-amd64.msi installer. This installs Go under C:\go. In addition, you need a git command line client (so that the Go build process can fetch the packer source code).
Set a bunch of environment variables
After installing Go, you need to set a few environment variables. The setx /M changes HKLM and needs admin privileges.
mkdir %USERPROFILE%\go
setx    GOPATH %USERPROFILE%\go
setx    GOBIN  %GOPATH%\bin
setx    PATH  %PATH%;%GOBIN%
setx /M GOROOT C:\Go\
setx /M GO15VENDOREXPERIMENT 1
Then, start a new shell (to pick up the changed environment variables) and run the command go get github.com/mitchellh/packer. That fetches the packer source code from github, compiles everything, and stores the packer.exe binary into your home directory’s %USERPROFILE%\go\bin\packer.exe
Security Setup
The next thing you need is a so-called ‘service principal’ in Azure Active Directory which has ‘Contributor’ access to your Azure subscription. In short, a service principal is a user account, used by an automated process (such as packer), which can login to Azure.
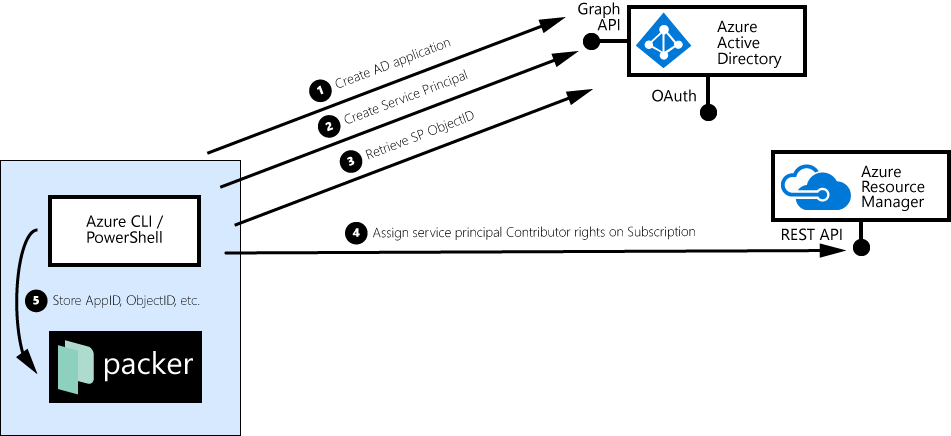
First, you create an app in Azure Active Directory:
azure ad app create --json \
  --name "Service Principal Packer" \
  --home-page "https://packer.geuer-pollmann.de" \
  --identifier-uris "https://packer.geuer-pollmann.de" \
  --key-type Password \
  --password SuperLongPassword123.-
Then, list the applications you have, pick your packer app, and take note of the application ID (appId):
azure ad app list --json
This call returns
[
  {
    "displayName": "Service Principal Packer",
    "objectType":  "Application",
    "appId":       "1326f47c-eaea-42aa-8aa8-ff99fbaf3da9",
    "objectId":    "aa0f0531-f84d-4205-b4a4-31016e136bc9",
    "availableToOtherTenants": false,
    "identifierUris": [ "https://packer.geuer-pollmann.de" ],
    "replyUrls":      [],
    "homepage":       "https://packer.geuer-pollmann.de"
  },
  ...
]
In the next step, we promote our app to be a “service principal”, and we list the service principals we have:
azure ad sp create --json -vv --applicationId 1326f47c-eaea-42aa-8aa8-ff99fbaf3da9

azure ad sp list --json
[
 {
   "displayName": "Service Principal Packer",
   "objectType":  "ServicePrincipal",
   "appId":       "1326f47c-eaea-42aa-8aa8-ff99fbaf3da9",
   "objectId":    "56e6ca9e-f654-4f92-88c5-5347c621efc7",
   "servicePrincipalNames": [ "http://geuer-pollmann.de/packer", "1326f47c-eaea-42aa-8aa8-ff99fbaf3da9" ]
 },
 ...
]
This time, note down the objectId of the service principal listing. (If you look closely, you’ll see that the appId from the azure ad app list and azure ad sp list calls is the same, but the objectId differs).
By this time, you should have 5 specific values:
- Your Azure Active Directory TenantID (use the
tenantIdfromazure account show --json) - Your Azure Subscription ID (the
idfromazure account show --json) - Your service principal’s
appId - Your service principal’s
objectId - Your service principal’s password. If you don’t know this one, it’s certainly
SuperLongPassword123.-. If so, you simply copy and pasted the code snippet above into your console. DO NOT COPY RANDOM STUFF INTO YOUR ADMIN CONSOLE. Even if I tell you so. Doing a zu-Guttenberg when it comes to security code is really bad practice. Callazure ad sp deleteandazure ad app deleteto delete the current service principal account, and start again. With. A. Secure. Password. Please.
As a last step of the security setup, you can assign your service principal ‘Contributor’ rights to your subscription (replace $spObjectId and $subscriptionId with proper values):
azure role assignment create \
  --objectId $spObjectId \
  --roleName Contributor \
  --scope "/subscriptions/$subscriptionId"
packer Setup
After you have installed packer, and you have retrieved all necessary Azure credentials, it’s time to run packer. Packer uses a JSON file to define how to create VMs, and what to do with the VMs once they are running.
packer config files have a few sections:
- The
"variables"section is a key/value collection, used to define values you’ll be using across the config / template file.- For example, we can store the
appIdandobjectIdvalues in the"variables"section. - You can store literal string values here, like
"object_id": "56e6ca9e-f654-4f92-88c5-5347c621efc7" - For sensitive values (such as the service principal’s password), it is a good idea to keep these out of your config file.
packerallows you to refer to environment variables. For example,"client_secret": "{{envAZURE_DE_PACKER_PASSWORD}}"let’spackerto check the local environment variableAZURE_DE_PACKER_PASSWORD, which value is then assigned to theclient_secretpacker variable.
- For example, we can store the
- The
"builders"section contains a list of deployment environments or locations. As mentioned previously,packersupports multiple cloud providers, hosters and virtualization environments (Azure Resource Manager, Amazon EC2, Digital Ocean, Google Compute Engine, VMWare, Parallels).- In addition, the provisioner has cloud-specific information, such as data center location, etc.
- For example, Azure Germany Central, Azure Europe West and Amazon US East could be three builders showing up in the same template.
- In the simplest case, packer then creates VM instances in all three deployment locations, logs in to the three VMs, and runs its provisioners.
- In the same way
packeruses the{{ env \foo` }}syntax to retrieve environment variable values, you can use the{{ user `somevariable` }}syntax to retrieve variables from the“variables”` section.
- The
"provisioners"section now describes the real steps to be performed, once the VMs are running, for example- On Linux, the
"shell"provisioner can run Unix shell commands - On Windows, the
"powershell"and the"windows-shell"provisioner run Powershell and cmd.exe commands respectively - The
"file"provisioner will upload files and folder structured from the packer machine to the VM
- On Linux, the
Here is an example of such a JSON file:
{
 "variables": {
    "azure_ad_tenant_id": "deadbeef-f84d-4205-b4a4-31016e136bc9",
    "azure_subscription_id": "01234567-f84d-4205-b4a4-31016e136bc9",
    "object_id": "aa0f0531-f84d-4205-b4a4-31016e136bc9",
    "app_id": "1326f47c-eaea-42aa-8aa8-ff99fbaf3da9",
    "client_secret": "{{env `AZURE_DE_PACKER_PASSWORD`}}",
    "resource_group": "admin",
    "storage_account": "packer"
  },
  "builders": [
    {
      "type": "azure-arm",
      "subscription_id": "{{user `azure_subscription_id`}}",
      "tenant_id": "{{user `azure_ad_tenant_id`}}",
      "object_id": "{{user `object_id`}}",
      "client_id": "{{user `app_id`}}",
      "client_secret": "{{user `client_secret`}}",
      "resource_group_name": "{{user `resource_group`}}",

      "cloud_environment_name": "AzureGermanCloud",
      "location": "Germany Central",
      "vm_size": "Standard_D3_v2",

      "storage_account": "{{user `storage_account`}}",
      "capture_container_name": "images",
      "capture_name_prefix": "packer",

      "os_type": "Windows",
      "image_publisher": "MicrosoftWindowsServer",
      "image_offer": "WindowsServer",
      "image_sku": "2012-R2-Datacenter",
      "image_version": "latest",

      "communicator": "winrm",
      "winrm_use_ssl": "true",
      "winrm_insecure": "true",
      "winrm_timeout": "3m",
      "winrm_username": "packer"
    }
  ],
  "provisioners": [
    {
      "type": "powershell",
      "inline": [
        "Import-Module ServerManager",
        "Install-WindowsFeature -Name NET-Framework-Features"
      ]
    },
    {
      "type": "windows-shell",
      "inline": [
        "cmd /c \"mkdir \\\"c:\\upload-windows\\\"\""
      ]
    },
    {
      "type": "file",
      "source": "upload-windows",
      "destination": "c:\\upload-windows"
    },
    {
      "type": "windows-shell",
      "inline": [
        "cmd /c \"c:\\upload-windows\\run.cmd\""
      ]
    },
  ]
}
I’d like to emphasize the following snippet: Here, we can see that the AzureGermanCloud is the deployment target, specificalls the Germany Central data center (which is Frankfurt am Main).
  "cloud_environment_name": "AzureGermanCloud",
  "location": "Germany Central",
The vm_size parameter describes which instance type to launch in Frankfurt. This size has nothing to do with the VM type where you intend to finally run your workload on, but it describes the machine size of the packer builder process. Using a faster machine here simply speeds up your packer run.
"vm_size": "Standard_D3_v2",
The following picture describes the interactions between packer and the Azure Platform:
Building a Windows VM Image
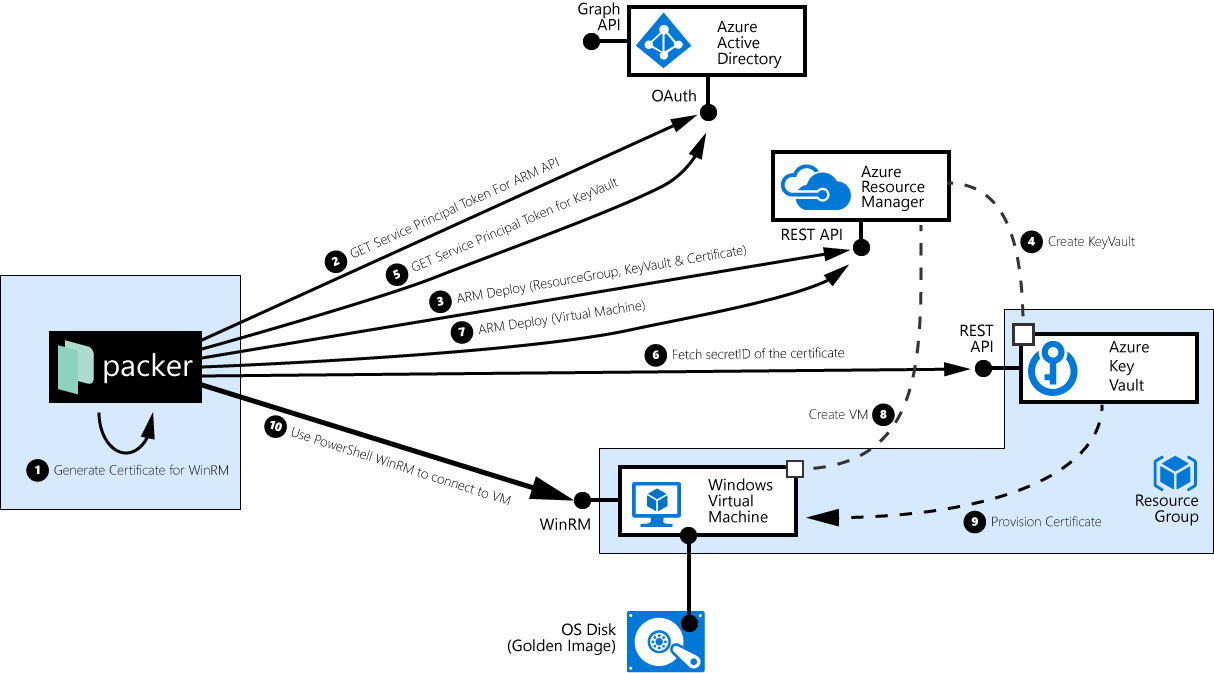
packercreates a self-signed X.509 certificate. When building Windows Images, packer uses PowerShell remoting / WinRM to connect to the VM, and it in order to authenticate the VM, this self-created certificate should be injected into the Windows VM.packerconnects to theazure_ad_tenant_idfrom the config file, uses the service principal’s credentials (app_idandclient_secret) and requests a security token for the Azure Resource Management API.packeruses the security token from step 2, to tell ARM to create a resource group in theazure_subscription_id, create an Azure KeyVault in that resource group, and to store the self-signed certificate (alongside with the private key) as a ‘secret’. In addition, theobject_idof the service principal is granted read privileges on that secret.- Behind the covers, Azure then enacts that ARM template deployment, creates the KeyVault, and stores the certificate.
packerconnects to theazure_ad_tenant_idfrom the config file, uses the service principal’s credentials (app_idandclient_secret) and again requests a security token, but this time for the previously created Azure Key Vault.packertries to download the previously injected certificate, and notes down the secret’s concrete version identifier.packerinstructs the ARM API to deploy a Windows VM and provision the certificate from the KeyVault into the VM.- Azure ARM launches the Windows VM, and …
- … injects the X509 certificate into the VM. The VM now uses the cert as a server-side certificate for WinRM. This step is the one where the
object_idof the service principal is important; in step 3 (when creating the KeyVault and the secret), the packer added itself to the access control list. Without read permissions on the secret, the VM would not - Finally,
packerconnects via WinRM to the VM, using it’s own Admin password, validates that the VM presents the previously generated and uploaded Certificate, and then ‘does its’ thing.
The sample output below shows what happens when I run packer build windows.json (I left out some noisy redundant lines):
C:\Users\chgeuer\packer-germany\> packer build windows.json
azure-arm output will be in this color.

==> azure-arm: Running builder ...
    azure-arm: Creating Azure Resource Manager (ARM) client ...
==> azure-arm: Creating resource group ...
==> azure-arm:  -> ResourceGroupName : 'packer-Resource-Group-26kdn5rsbm'
==> azure-arm:  -> Location          : 'Germany Central'
==> azure-arm: Validating deployment template ...
==> azure-arm: Deploying deployment template ...
==> azure-arm: Getting the certificate's URL ...
==> azure-arm:  -> Key Vault Name        : 'pkrkv26kdn5rsbm'
==> azure-arm:  -> Key Vault Secret Name : 'packerKeyVaultSecret'
==> azure-arm:  -> Certificate URL       : 'https://pkrkv26kdn5rsbm.vault.microsoftazure.de/secrets/packerKeyVaultSecret/a01b535c0e784877bc6b2ac85d9beb03'
==> azure-arm: Setting the certificate's URL ...
==> azure-arm: Validating deployment template ...
==> azure-arm: Deploying deployment template ...
==> azure-arm: Getting the public IP address ...
==> azure-arm:  -> ResourceGroupName   : 'packer-Resource-Group-26kdn5rsbm'
==> azure-arm:  -> PublicIPAddressName : 'packerPublicIP'
==> azure-arm:  -> Public IP           : '51.4.226.104'
==> azure-arm: Waiting for WinRM to become available...
==> azure-arm: Connected to WinRM!
==> azure-arm: Provisioning with Powershell...
==> azure-arm: Provisioning with shell script: C:\Users\chgeuer\AppData\Local\Temp\packer-powershell-provisioner963009603
    azure-arm:
    azure-arm: Directory: C:\
    azure-arm:
    azure-arm: Mode                LastWriteTime     Length Name
    azure-arm: ----                -------------     ------ ----
    azure-arm: d----         9/19/2016   9:05 PM            Packages
    azure-arm: d----         8/22/2013   3:52 PM            PerfLogs
    azure-arm: d-r--         8/10/2016  11:02 PM            Program Files
    azure-arm: d----         8/22/2013   3:39 PM            Program Files (x86)
    azure-arm: d-r--         9/19/2016   9:05 PM            Users
    azure-arm: d-r--         9/19/2016   9:04 PM            Windows
    azure-arm: d----         9/19/2016   9:05 PM            WindowsAzure
==> azure-arm: Querying the machine's properties ...
==> azure-arm:  -> ResourceGroupName : 'packer-Resource-Group-26kdn5rsbm'
==> azure-arm:  -> ComputeName       : 'pkrvm26kdn5rsbm'
==> azure-arm:  -> OS Disk           : 'https://packer.blob.core.cloudapi.de/images/pkros26kdn5rsbm.vhd'
==> azure-arm: Powering off machine ...
==> azure-arm: Capturing image ...
==> azure-arm: Deleting resource group ...
==> azure-arm:  -> ResourceGroupName : 'packer-Resource-Group-26kdn5rsbm'
==> azure-arm: Deleting the temporary OS disk ...
==> azure-arm:  -> OS Disk : 'https://packer.blob.core.cloudapi.de/images/pkros26kdn5rsbm.vhd'
Build 'azure-arm' finished.

==> Builds finished. The artifacts of successful builds are:
--> azure-arm: Azure.ResourceManagement.VMImage:

StorageAccountLocation: germanycentral
OSDiskUri: https://packer.blob.core.cloudapi.de/system/Microsoft.Compute/Images/images/packer-osDisk.1cf672de-e71f-4efb-ae63-e4dcd997054f.vhd
OSDiskUriReadOnlySas: https://packer.blob.core.cloudapi.de/system/Microsoft.Compute/Images/images/packer-osDisk.1cf672de-e71f-4efb-ae63-e4dcd997054f.vhd?se=2016-08-07T09%3A35%3A14Z&sig=...%3D&sp=r&sr=b&sv=2015-02-21
TemplateUri: https://packer.blob.core.cloudapi.de/system/Microsoft.Compute/Images/images/packer-vmTemplate.1cf672de-e71f-4efb-ae63-e4dcd997054f.json
TemplateUriReadOnlySas: https://packer.blob.core.cloudapi.de/system/Microsoft.Compute/Images/images/packer-vmTemplate.1cf672de-e71f-4efb-ae63-e4dcd997054f.json?se=2016-08-07T09%3A35%3A14Z&sig...%3D&sp=r&sr=b&sv=2015-02-21
The interesting information comes at the end: After powering off the machine, packer captures the actual VM OS disk image, then deletes all ephemenral resources (i.e. the complete resource group), and tells me with the OSDiskUri parameter where my actual disk image is stored. From now on, I can use that “golden image” in my ARM templates, when I launch new machines:
 "storageProfile": {
      "osDisk" : {
          "name" : "[concat(parameters('vmName'),'-osDisk')]",
          "osType" : "Windows",
          "caching" : "ReadWrite",
          "image" : {
              "uri" : "https://packer.blob.core.cloudapi.de/system/Microsoft.Compute/Images/images/..."
          },
          "vhd" : {
              "uri" : "[variables('osDiskVhdName')]"
          }
      }
  },
Building a Linux VM Image
Building a Linux VM image doesn’t differ very much from the previously described Windows process. The main difference from a configuration prespective is that for Linux, I can omit the object_id. And instead of the "windows-shell" and "powershell" provisioners, I use the "shell" Provisioner. And the fact that packer now uses SSH, instead of WinRM, to connect to the VM.
For those interested in the detailed interactions and flow, the following picture shows why we were able to omit the object_id:

For Linux VMs, packer directly creates the VM, without creating a KeyVault first.
End
I hope the article was interesting, gave you a greater understanding how packer can be used together with Azure Resource Manager, and demonstrated a bit of the openness of the Azure Platform :-).
Feedback alway appreciated via Twitter, or the comments section below.
PS: And a big thank-you and shout out to my fellow Microsoft colleague Christopher Boumenot for adding the Azure Germany Environment to the packer base… Good stuff!