Establishing a fast feedback loop for ARM Template Language Expressions
In the past years, I’ve spent much time authoring Azure resource manager (ARM) templates, i.e. JSON documents which describe deployments in Microsoft’s Azure cloud environment. These JSON-based ARM documents can contain so-called ARM template language expressions, which are represented by JSON strings. For example, the JSON object { "someInteger": "[add(1, mul(2, 3))]" } would be transformed into { "someInteger": 7 }. The string with brackets "[...]" means that the inner content needs to be evaluated, and the string be replaced by the value.
I have a couple of challenges authoring ARM templates:
errors in complex template expressions often only show up, after I submit the deployment to Azure and the content is evaluated by ARM, which can take seconds to minutes.
error messages are sometimes a bit ‘obscure’, because ARM parses the JSON doc into an object, and the error message says that expression xyz, in line 1, character position 12320, is illegal. So ARM on the server flattens the document into a single line.
Overall, the feedback loop is quite slow.
In order to solve my pain point, I started a small hobby project, the “Microsoft ARM Evaluator” github.com/chgeuer/ex_microsoft_arm_evaluator. This tool runs on the developer laptop, it reads an existing ARM file, parses and evaluates the TLE expressions, and writes the evaluated result to a second file. In order to make it easy to compare the input and result, the tool uses a custom JSON parser which preserves whitespace within the JSON document:
Demo video
Running the code
The application is written in Elixir, a language running on top of the Erlang virtual machine. You currently need to install Erlang and Elixir locally on your machine, and then clone and compile the application:
Once cloned, run mix deps.get and mix compile in the project directory.
On Windows, set the environment variable iex_with_werl=true, so that the Elixir interactive shell runs as separate window.
Within the Elixir console, you do a few things now:
alias Microsoft.Azure.TemplateLanguageExpressions.{Resource, Context, DeploymentContext, Evaluator.Resource} saves us some typing on a few Elixir module names.
login_cred = DemoUtil.login() triggers a device authentication flow against the Azure management API. Login in a browser via microsoft.com/devicelogin
sub = "724467b5-bee4-484b-bf13-d6a5505d2b51" sets a subscription ID
deploymentContext = %DeploymentContext{ subscriptionId: sub, resourceGroup: "longterm" } |> DeploymentContext.with_device_login(login_cred) creates a deplyoment context against which to evaluate the ARM template file.
DemoUtil.transform("sample_files/1.json", deploymentContext, %{}) now reads the 1.json file from the samples directory, and creates a 1.json.result.json file, with all evaluabtable pieces expanded.
Special thanks for José Valim (inventor of Elixir) for creating nimble parsec, a slick parser combinator library which I used for whitespace- and comment-aware JSON parsing, and Azure template language expression parsing.
Interesting bits
Check the ARM unit tests, to understand how the TLE expressions evaluate to JSON values: test/static_tests.json
Sometimes I need a zero-install way to interact with Azure. I have no specific Azure utilities at hand, no Python, no nothing. Usually, Azure management is done using PowerShell, the az cli or, if you want raw REST calls, the armclient. But for my customer, even can be too much ceremony.
So the question was how can I get going with purely bash, cURL and jq for JSON parsing?
If you’re running inside a VM, with Managed Identity enabled, you can easily fetch a token. But unfortunately the VM wasn’t authorized to hit the resource I care about.
Next stop service principals. Problem is customer’s AD admin team running a tough regime, and don’t hand out service principals.
So ultimately, how can I get my actual AAD user identity avail in the shell? In the end, all I need is a bearer token.
Let’s dive right in:
A few variables first
I want to authN against ‘my’ Azure AD tenant, and want to hit the Azure ARM REST API:
For the full user login, i.e. device authN, here’s what happens under the hood: The code needs to fetch a device code, and then use that code to poll and validate whether the user authenticated. Quick hint: If you wanna snoop on cURL’s requests with something like fiddler, you should add this --proxy http://127.0.0.1:8888/ --insecure to the calls.
Assuming we have a ‘real’ service principal, we can do this:
#!/bin/bashresource="https://management.azure.com/"aadTenant="chgeuerfte.onmicrosoft.com"SAMPLE_SP_APPID="*** put your service principal application ID here ***"SAMPLE_SP_KEY="*** put your service principal application secret here ***"access_token="$(curl \--silent\--request POST \--data-urlencode"grant_type=client_credentials"\--data-urlencode"client_id=${SAMPLE_SP_APPID}"\--data-urlencode"client_secret=${SAMPLE_SP_KEY}"\--data-urlencode"resource=${resource}"\"https://login.microsoftonline.com/${aadTenant}/oauth2/token" | \
jq -r".access_token")"
Using managed VM identity (running inside an Azure VM)
Fetching a secret from Azure KeyVault using a managed identity
This little script demonstrates how to fetch a secret from an Azure KeyVault, using a managed identity on an Azure VM. Just adapt key_vault_name and secret_name accordingly, and of course ensure that the managed identity can actually read the secret.
The following script might help to make that task a bit easier: It uses the Azure cli to iterate over your subscriptions, and all data center locations within these subscriptions, and then prints out the relevant information as tab-separated lines to STDOUT.
When you redirect the output to a text file (./get-quota-info.sh > quotas.tsv), you can open the text file in a text editor, copy/paste the contents into Excel, create a table from it, and filter.
The text output looks like below (just tabs, no spaces), and contains the following data:
subscription id
azure location
azure network resource provider (compute or storage)
On my Windows box, I have docker for Windows installed, which expects volume mount parameters in the form of -v C:/Users/chgeuer/Desktop:/mnt, i.e. the local laptop’s filesystem path is the Windows-style path with a drive letter, and the backslashes substituted by forward slashes.
On the Linux side of things, people usually mount the current working directory by specifying -v $(pwd):/mnt. When I run that on the Windows subsystem for Linux (or is the the Linux subsystem for Windows?), that expands to -v /mnt/c/Users/chgeuer/Desktop:/mnt. That /mnt/c stuff unfortunately isn’t recognized by the docker for Windows daemon.
Solution
Instead of -v $(pwd):/app, use -v $(echo $(pwd) | sed 's/^\/mnt\/\(.\)/\1:/'):/app
This basically calls $(pwd) to determine the current working directory, and replaces /mnt/x with x:, so Docker works correctly.
Example
A rather convoluted way to ls the current directory would be
docker run --rm--volume=$(echo$(pwd) | sed's/^\/mnt\/\(.\)/\1:/'):/foo -it alpine:latest ls-als /foo
Today (in September 2016, that is), the Microsoft Cloud for Germany goes live (or as Microsoft calls it, becomes Generally Available). For me personally, having many customers with ‘non-Microsoft’-Workloads, it is a pleasure to see that Azure Germany is as open as the the existing International data centers. Customers such as TeamDrive, platform.sh or G DATA use our German data centers for their critical workloads, alongside with the pretty interesting Data Trustee Model, which Microsoft and Deutsche Telekom established for Frankfurt and Magdeburg regions.
I wanted to take the opportunity to show how both Microsoft Azure Cloud for Germany, as well as worldwide, provide an open platform and support the open source ecosystem. In the previous article, I described how you can create a service principal in Azure Active Directory (incl. Azure in Germany). In this article, we will explore how to use Hashicorp’s open-source packer toolchain to automatically create custom VM images, both for Windows- and Linux-VMs.
Before we dig into the details, let’s first explore which options we have to get software packages installed on a VM in the cloud:
How to install software on a VM in the cloud?
Manual installation
The easiest, ad-hoc approach is to just spin off a Windows/Linux VM, then RDP/ssh into the box, copy the bits over, and click sudo start setup.exe and the like. Clearly, that’s a low barrier of entry, but is totally error-prone, non-repeatable and labor intense. When new versions of the software get released, patches are rolled out, etc., somebody must invest time to build a new “golden master” VM image.
Configuration Management Tools such as puppet, Chef, Ansible, Salt Stack or Powershell Desired State Configuration provide a great story for managing large fleets of VMs in the cloud, preventing configuration drift, applying changes to large sets of machines, etc.
Often though, these tools need some sort of central server running somewhere, like a ‘DSC pull server’ or a ‘Chef server’ to host and run the runbooks, recipies, and what have you.
Custom Script Extension
For simple cases of automating software installation, Azure supports the custom script extension. This extension allows an ARM-based VM deployment to refer to a shell script, and additional assets, which upon deployment time are downloaded onto the VM, and executed.
The following example ensures that a .sh-script and an .tar.gz-archive are downloaded to the VM, and the script is executed using the BASH shell:
The previous example lists directly downloadable resources. Using “Shared Access Signatures” to control access to blobs in Azure Storage, with ARM template parameters, and the ARM [concat()] function, you can also ensure that confidential assets are not plain on the Internets (as I do here for illustration purposes).
The largest disadvantage of the custom script extension is the impact on runtime performance, respectively deployment latency: When you deploy a set of VMs using an ARM template, assuming each of these machines need to download and install a reasonably complect software package, it can take quite a while until all machines are ready to rock.
packer
Hashicorp’s open-source packer tool is an executable which can be launched on a local machine (such as a developer’s laptop, or a build server). packer spins up a VM in one or more data centers (and one or more clouds for that matter). Once the VMs are up and running, packer connects to the VM (using Powershell WinRM for Windows VMs, or ssh for Linux VMs), and does whatever you want it to do. Most important, you can let packer upload files, and run commands on the remote machine. At the end of all tasks on the VM, packer runs sysprep and shuts down the VM, resulting in a ‘golden image’ you can then use to fire off readily installed VMs.
Compared to the custom script extension, packer shifts waiting time away from the actual VM provisioning: Whenever the software department releases a new version, the build server can connect to all deployment environments (cloud vendors and data centers), and create the latest and greatest image. So longer “compile/build time”, much faster “deploy/startup time”.
Provisioning a Windows VM
In this article, we’ll dig into provisioning a Windows and a Linux VM in Azure Germany.
![packer interactions with Azure provisining a Windows VM][windowsflow]
But before we can see all this happening, we need to do a bit of homework:
Install packer
packer is a stand-alone compiled binary, implemented in Go. You can grab compiled Mac OS X/Linux/Windows binaries from the packer downloads page, or you compile it yourself.
Building packer from scratch (on Windows)
If you’re running on Windows, first install Go from the downloads page. I used the go1.7.1.windows-amd64.msi installer. This installs Go under C:\go. In addition, you need a git command line client (so that the Go build process can fetch the packer source code).
Set a bunch of environment variables
After installing Go, you need to set a few environment variables. The setx /M changes HKLM and needs admin privileges.
Then, start a new shell (to pick up the changed environment variables) and run the command go get github.com/mitchellh/packer. That fetches the packer source code from github, compiles everything, and stores the packer.exe binary into your home directory’s %USERPROFILE%\go\bin\packer.exe
Security Setup
The next thing you need is a so-called ‘service principal’ in Azure Active Directory which has ‘Contributor’ access to your Azure subscription. In short, a service principal is a user account, used by an automated process (such as packer), which can login to Azure.
First, you create an app in Azure Active Directory:
azure ad app create --json\--name"Service Principal Packer"\--home-page"https://packer.geuer-pollmann.de"\--identifier-uris"https://packer.geuer-pollmann.de"\--key-type Password \--password SuperLongPassword123.-
Then, list the applications you have, pick your packer app, and take note of the application ID (appId):
azure ad app list --json
This call returns
[{"displayName":"Service Principal Packer","objectType":"Application","appId":"1326f47c-eaea-42aa-8aa8-ff99fbaf3da9","objectId":"aa0f0531-f84d-4205-b4a4-31016e136bc9","availableToOtherTenants":false,"identifierUris":["https://packer.geuer-pollmann.de"],"replyUrls":[],"homepage":"https://packer.geuer-pollmann.de"},...]
In the next step, we promote our app to be a “service principal”, and we list the service principals we have:
azure ad sp create --json-vv--applicationId 1326f47c-eaea-42aa-8aa8-ff99fbaf3da9
azure ad sp list --json
[{"displayName":"Service Principal Packer","objectType":"ServicePrincipal","appId":"1326f47c-eaea-42aa-8aa8-ff99fbaf3da9","objectId":"56e6ca9e-f654-4f92-88c5-5347c621efc7","servicePrincipalNames":["http://geuer-pollmann.de/packer","1326f47c-eaea-42aa-8aa8-ff99fbaf3da9"]},...]
This time, note down the objectId of the service principal listing. (If you look closely, you’ll see that the appId from the azure ad app list and azure ad sp list calls is the same, but the objectId differs).
By this time, you should have 5 specific values:
Your Azure Active Directory TenantID (use the tenantId from azure account show --json)
Your Azure Subscription ID (the id from azure account show --json)
Your service principal’s appId
Your service principal’s objectId
Your service principal’s password. If you don’t know this one, it’s certainly SuperLongPassword123.-. If so, you simply copy and pasted the code snippet above into your console. DO NOT COPY RANDOM STUFF INTO YOUR ADMIN CONSOLE. Even if I tell you so. Doing a zu-Guttenberg when it comes to security code is really bad practice. Call azure ad sp delete and azure ad app delete to delete the current service principal account, and start again. With. A. Secure. Password. Please.
As a last step of the security setup, you can assign your service principal ‘Contributor’ rights to your subscription (replace $spObjectId and $subscriptionId with proper values):
azure role assignment create \--objectId$spObjectId\--roleName Contributor \--scope"/subscriptions/$subscriptionId"
packer Setup
After you have installed packer, and you have retrieved all necessary Azure credentials, it’s time to run packer. Packer uses a JSON file to define how to create VMs, and what to do with the VMs once they are running.
packer config files have a few sections:
The "variables" section is a key/value collection, used to define values you’ll be using across the config / template file.
For example, we can store the appId and objectId values in the "variables" section.
You can store literal string values here, like "object_id": "56e6ca9e-f654-4f92-88c5-5347c621efc7"
For sensitive values (such as the service principal’s password), it is a good idea to keep these out of your config file. packer allows you to refer to environment variables. For example, "client_secret": "{{env AZURE_DE_PACKER_PASSWORD}}" let’s packer to check the local environment variable AZURE_DE_PACKER_PASSWORD, which value is then assigned to the client_secret packer variable.
The "builders" section contains a list of deployment environments or locations. As mentioned previously, packer supports multiple cloud providers, hosters and virtualization environments (Azure Resource Manager, Amazon EC2, Digital Ocean, Google Compute Engine, VMWare, Parallels).
In addition, the provisioner has cloud-specific information, such as data center location, etc.
For example, Azure Germany Central, Azure Europe West and Amazon US East could be three builders showing up in the same template.
In the simplest case, packer then creates VM instances in all three deployment locations, logs in to the three VMs, and runs its provisioners.
In the same way packer uses the {{ env \foo` }} syntax to retrieve environment variable values, you can use the {{ user `somevariable` }} syntax to retrieve variables from the “variables”` section.
The "provisioners" section now describes the real steps to be performed, once the VMs are running, for example
On Linux, the "shell" provisioner can run Unix shell commands
On Windows, the "powershell" and the "windows-shell" provisioner run Powershell and cmd.exe commands respectively
The "file" provisioner will upload files and folder structured from the packer machine to the VM
I’d like to emphasize the following snippet: Here, we can see that the AzureGermanCloud is the deployment target, specificalls the Germany Central data center (which is Frankfurt am Main).
The vm_size parameter describes which instance type to launch in Frankfurt. This size has nothing to do with the VM type where you intend to finally run your workload on, but it describes the machine size of the packer builder process. Using a faster machine here simply speeds up your packer run.
"vm_size": "Standard_D3_v2",
The following picture describes the interactions between packer and the Azure Platform:
Building a Windows VM Image
packer creates a self-signed X.509 certificate. When building Windows Images, packer uses PowerShell remoting / WinRM to connect to the VM, and it in order to authenticate the VM, this self-created certificate should be injected into the Windows VM.
packer connects to the azure_ad_tenant_id from the config file, uses the service principal’s credentials (app_id and client_secret) and requests a security token for the Azure Resource Management API.
packer uses the security token from step 2, to tell ARM to create a resource group in the azure_subscription_id, create an Azure KeyVault in that resource group, and to store the self-signed certificate (alongside with the private key) as a ‘secret’. In addition, the object_id of the service principal is granted read privileges on that secret.
Behind the covers, Azure then enacts that ARM template deployment, creates the KeyVault, and stores the certificate.
packer connects to the azure_ad_tenant_id from the config file, uses the service principal’s credentials (app_id and client_secret) and again requests a security token, but this time for the previously created Azure Key Vault.
packer tries to download the previously injected certificate, and notes down the secret’s concrete version identifier.
packer instructs the ARM API to deploy a Windows VM and provision the certificate from the KeyVault into the VM.
Azure ARM launches the Windows VM, and …
… injects the X509 certificate into the VM. The VM now uses the cert as a server-side certificate for WinRM. This step is the one where the object_id of the service principal is important; in step 3 (when creating the KeyVault and the secret), the packer added itself to the access control list. Without read permissions on the secret, the VM would not
Finally, packer connects via WinRM to the VM, using it’s own Admin password, validates that the VM presents the previously generated and uploaded Certificate, and then ‘does its’ thing.
The sample output below shows what happens when I run packer build windows.json (I left out some noisy redundant lines):
C:\Users\chgeuer\packer-germany\> packer build windows.json
azure-arm output will be in this color.

==> azure-arm: Running builder ...
    azure-arm: Creating Azure Resource Manager (ARM) client ...
==> azure-arm: Creating resource group ...
==> azure-arm:  -> ResourceGroupName : 'packer-Resource-Group-26kdn5rsbm'
==> azure-arm:  -> Location          : 'Germany Central'
==> azure-arm: Validating deployment template ...
==> azure-arm: Deploying deployment template ...
==> azure-arm: Getting the certificate's URL ...
==> azure-arm:  -> Key Vault Name        : 'pkrkv26kdn5rsbm'
==> azure-arm:  -> Key Vault Secret Name : 'packerKeyVaultSecret'
==> azure-arm:  -> Certificate URL       : 'https://pkrkv26kdn5rsbm.vault.microsoftazure.de/secrets/packerKeyVaultSecret/a01b535c0e784877bc6b2ac85d9beb03'
==> azure-arm: Setting the certificate's URL ...
==> azure-arm: Validating deployment template ...
==> azure-arm: Deploying deployment template ...
==> azure-arm: Getting the public IP address ...
==> azure-arm:  -> ResourceGroupName   : 'packer-Resource-Group-26kdn5rsbm'
==> azure-arm:  -> PublicIPAddressName : 'packerPublicIP'
==> azure-arm:  -> Public IP           : '51.4.226.104'
==> azure-arm: Waiting for WinRM to become available...
==> azure-arm: Connected to WinRM!
==> azure-arm: Provisioning with Powershell...
==> azure-arm: Provisioning with shell script: C:\Users\chgeuer\AppData\Local\Temp\packer-powershell-provisioner963009603
    azure-arm:
    azure-arm: Directory: C:\
    azure-arm:
    azure-arm: Mode                LastWriteTime     Length Name
    azure-arm: ----                -------------     ------ ----
    azure-arm: d----         9/19/2016   9:05 PM            Packages
    azure-arm: d----         8/22/2013   3:52 PM            PerfLogs
    azure-arm: d-r--         8/10/2016  11:02 PM            Program Files
    azure-arm: d----         8/22/2013   3:39 PM            Program Files (x86)
    azure-arm: d-r--         9/19/2016   9:05 PM            Users
    azure-arm: d-r--         9/19/2016   9:04 PM            Windows
    azure-arm: d----         9/19/2016   9:05 PM            WindowsAzure
==> azure-arm: Querying the machine's properties ...
==> azure-arm:  -> ResourceGroupName : 'packer-Resource-Group-26kdn5rsbm'
==> azure-arm:  -> ComputeName       : 'pkrvm26kdn5rsbm'
==> azure-arm:  -> OS Disk           : 'https://packer.blob.core.cloudapi.de/images/pkros26kdn5rsbm.vhd'
==> azure-arm: Powering off machine ...
==> azure-arm: Capturing image ...
==> azure-arm: Deleting resource group ...
==> azure-arm:  -> ResourceGroupName : 'packer-Resource-Group-26kdn5rsbm'
==> azure-arm: Deleting the temporary OS disk ...
==> azure-arm:  -> OS Disk : 'https://packer.blob.core.cloudapi.de/images/pkros26kdn5rsbm.vhd'
Build 'azure-arm' finished.

==> Builds finished. The artifacts of successful builds are:
--> azure-arm: Azure.ResourceManagement.VMImage:

StorageAccountLocation: germanycentral
OSDiskUri: https://packer.blob.core.cloudapi.de/system/Microsoft.Compute/Images/images/packer-osDisk.1cf672de-e71f-4efb-ae63-e4dcd997054f.vhd
OSDiskUriReadOnlySas: https://packer.blob.core.cloudapi.de/system/Microsoft.Compute/Images/images/packer-osDisk.1cf672de-e71f-4efb-ae63-e4dcd997054f.vhd?se=2016-08-07T09%3A35%3A14Z&sig=...%3D&sp=r&sr=b&sv=2015-02-21
TemplateUri: https://packer.blob.core.cloudapi.de/system/Microsoft.Compute/Images/images/packer-vmTemplate.1cf672de-e71f-4efb-ae63-e4dcd997054f.json
TemplateUriReadOnlySas: https://packer.blob.core.cloudapi.de/system/Microsoft.Compute/Images/images/packer-vmTemplate.1cf672de-e71f-4efb-ae63-e4dcd997054f.json?se=2016-08-07T09%3A35%3A14Z&sig...%3D&sp=r&sr=b&sv=2015-02-21
The interesting information comes at the end: After powering off the machine, packer captures the actual VM OS disk image, then deletes all ephemenral resources (i.e. the complete resource group), and tells me with the OSDiskUri parameter where my actual disk image is stored. From now on, I can use that “golden image” in my ARM templates, when I launch new machines:
Building a Linux VM image doesn’t differ very much from the previously described Windows process. The main difference from a configuration prespective is that for Linux, I can omit the object_id. And instead of the "windows-shell" and "powershell" provisioners, I use the "shell" Provisioner. And the fact that packer now uses SSH, instead of WinRM, to connect to the VM.
For those interested in the detailed interactions and flow, the following picture shows why we were able to omit the object_id:
For Linux VMs, packer directly creates the VM, without creating a KeyVault first.
End
I hope the article was interesting, gave you a greater understanding how packer can be used together with Azure Resource Manager, and demonstrated a bit of the openness of the Azure Platform :-).
Feedback alway appreciated via Twitter, or the comments section below.
PS: And a big thank-you and shout out to my fellow Microsoft colleague Christopher Boumenot for adding the Azure Germany Environment to the packer base… Good stuff!
In my customer engagements, I usually push early for deployment automation of some sort. My preferred way to deploy to Azure is using Azure Resource Manager JSON Templates, alongside with developer-side automated scripts. Personally I also appreciate the notion of Service Principals, i.e. using “strong” credentials such as an X.509 Certificate to authenticate to Azure Resource Manager (ARM) API.
In order to make it a bit more interesting, this article uses the “Microsoft Azure Germany” environment, instead of the ‘regular’ Azure.
Registering Azure Germany under the hood
When you install the latest Powershell for Azure (v1.5.0 at time of this writing), the command Get-AzureEnvironment | select Name should look like this:
The last line AzureGermanCloud indicates that Powershell already knows the specific management endpoints for Germany.
If you do not have that, you might consider re-installing the Powershell module
# Install the Azure Resource Manager modules from the PowerShell GalleryInstall-ModuleAzureRMInstall-AzureRMInstall-ModuleAzureImport-AzureRMImport-ModuleAzure
For the azure-cli side of things, the output of azure account env list should look like this:
In order to authenticate to Azure later, I want my service principal to use an X.509 Certificate. You can just bake yourself an own one using makecert.exe if you like. In my case, I saved a copy of the actual certificate on my local harddisk, which I then read into Powershell:
Each application must have a name and a URL. In case your application is an actual web application, that URL would correspond to the real web site address. In my case, that’s just some non-existent dummy URL:
$appName="Service Principal Lenovo my Laptop $($userName)"$dummyUrl="http://some-domain.com/whatever"$application=New-AzureRmADApplication`
-DisplayName$appName`
-HomePage$dummyUrl`
-IdentifierUris$dummyUrl`
-KeyTypeAsymmetricX509Cert`
-KeyValue$credValue
Promote the app to become a service principal
As part of a larger script, you should pause execution for a few seconds, as it might take 1-2 seconds for that service principal information to propagate through AAD.
Use that service principal to log-in to Azure using Powershell
The following code assumes that you imported the certificate into your Windows Certificate store. As you can see, the CurrentUser\My certificate store contains the X509 cert, and I also own the private key:
Use that service principal to log-in to Azure using node.js / azure-cli
The same thing can be done using the azure-cli. The main difference is that the azure-cli isn’t aware of Windows certificate stores, but still requires access to the certificate’s private key. In this case, the private key is in a PEM-file on my laptop’s harddisk:
Sometimes you just want to call Azure Storage REST API to create an “Azure Files” file share, no questions asked, no SDK installed. Just do it, please…
Tl’dr: For this walkthrough, I assume you have some familiarity with Azure Media Services. I explain how the DNS setup, and Akamai configuration need to look like, to put Akamai CDN in front of your origin server for video streaming.
Microsoft Azure Media Services is Microsoft’s PaaS offering for video encoding, and delivery. Through encoding, customers transcode their great original video (sometimes called a ‘mezzanine file’) into a set of multiple MP4 files in various bitrates and resolutions (multi-bitrate asset). These individual MP4 files are then stored in Azure Blob Storage. An ‘origin server’ can be used for dynamic packaging and streaming into various formats, such as HTTP Live Streaming (HLS), Microsoft IIS Smooth Streaming, MPEG-DASH, and Adobe HTTP Dynamic Streaming (HDS).
An Azure Media Services Origin Server (formally called ‘On-Demand Streaming Reserved Units’) has a finite amount of data transmission (egress) capacity of 200 Mbit/sec. As always, having gazillions of users hitting the same machine machine is never a good idea. Fortunately, all this HLS/Smooth/DASH/HDS stuff is just a series of many small HTTP requests, and is cacheable with a CDN. Azure CDN can easily be enabled for these origin servers. If you want to use Akamai CDN, instead of the standard Azure CDN, then this walkthrough is for you.
Pricing Note: In March 2015, Microsoft announced that as part of the integration between Azure Media Services and Azure CDN, “you are not charged for the outbound traffic from the Azure data center to the CDN edge nodes”. So when a customer watches a video, and the video isn’t cached in the CDNs edge node (or point of presence / POP), the edge node fetches the video from the origin server, caches it and sends the now cached content to the customer. The transfer from the origin server in Azure to the Azure CDN edge node does not show up on your Azure bill, the delivery from the Azure CDN to the customer’s laptop does show up. This integration is only enacted for the Azure CDN! When you self-configure Akamai CDN in front of an Azure Origin Server, then the data transfers from Azure to Akamai show up on your Azure invoice, and the delivery of cached content from Akamai to the viewer shows up on your Akamai invoice.
DNS and naming issues:
First, let’s summarize some naming bits and pieces:
Have an Azure Media Services Account
When I create an Azure Media Services account, I have to choose an account name. In this example, it will be mediaservice321.
Have a (reserved) streaming unit
There is a now shared default ‘streaming endpoint’ called mediaservice321.streaming.mediaservices.windows.net.
To get the 200 Mbit/sec per streaming unit, and for all the fancy DNS CNAME tricks, I need to scale my streaming endpoint to have one or more (reserved) streaming units. Out of the box, it has 0 streaming units. After that scale operation, I have the 200 Mbit/sec per streaming unit, and I can configure custom host names.
Have a clean host name
For streaming my video assets, I want a neat and clean ‘vanity’ hostname, i.e. I do not want some Azure or Akamai artefacts show up in the URL. In my case, I’d like to have my viewers to get the videos from videos.geuer-pollmann.de. videos.geuer-pollmann.de will be a DNS CNAME pointing to Akamai, but I also want to configure Azure Media Services to accept requests for that URL. Specifically, Akamai will be configured to forward the incoming host header to the origin, so mediaservice321.streaming.mediaservices.windows.net must be configured to accept requests for videos.geuer-pollmann.de, even if the real DNS doesn’t point to the origin server directly.
Before I can configure my ‘custom host name’ video.geuer-pollmann.de for my streaming endpoint, Azure wants some proof that I excercise control over the geuer-pollmann.de domain, and they want me to create some DNS entry to show that. In the dashboard of my ‘Azure Media Services Account’, I can see it has a ‘media service id’ called 13b2246c-82f5-40f5-b102-cf7d74b956ab. Azure now asks me to configure my own DNS server to let 13b2246c-82f5-40f5-b102-cf7d74b956ab.geuer-pollmann.de to be a CNAME entry pointing to verifydns.mediaservices.windows.net.
</img>
At my own DNS provider, I add the verification entry:
</img>
A quick dig query against DNS tells me when I’m done
$ dig @8.8.8.8 +noall +answer 13b2246c-82f5-40f5-b102-cf7d74b956ab.geuer-pollmann.de

13b2246c-82f5-40f5-b102-cf7d74b956ab.geuer-pollmann.de. 21590 IN CNAME verifydns.mediaservices.windows.net.
verifydns.mediaservices.windows.net.                     3590 IN A     1.1.1.1
Now I can finally tell Azure to accept my custom host name on the origin server:
</img>
Akamai Configuration
On the Akamai side, you first need to have access to the Luna control center. You might need to work with your Akamai representative how to get access.
Create an ‘Adaptive Media Delivery’ property
In Luna, you now login to your contract, and create an ‘Adaptive Media Delivery’ property, and name it (for simplicity) with your intended public host name.
</img>
Add the hostname
Inside the property, you then add the real hostname to the property.
</img>
Use the Standard Hostname.
</img>
Choose IPv4.
</img>
Review
In the review screen, Akamai now knows that requests for video.geuer-pollmann.de will be coming in, and tells us that these will have to go to video.geuer-pollmann.de.akamaized.net.
</img>
Configure my vanity hostname in my own DNS
Now I need to configure my own DNS so that video.geuer-pollmann.de is a CNAME entry for video.geuer-pollmann.de.akamaized.net, and I also set the time-to-live (TTL) to an hour.
Configure “Origin Server” and “Content Provider Code”
Now that the public vanity hostname is set, both in Akamai and our DNS, we can continue Akamai configuration. In the “property configuration settings” –> “Default Rule” –> “Behaviors”, we set finish our configuration:
The “Origin Server” needs to be configures like this:
The “Origin Type” is set to “Your Origin”.
The “Origin Server Hostname” is set to the physical hostname of the Azure origin server, in our case mediaservice321.streaming.mediaservices.windows.net.
The “Forward Host Header” is set to “Incoming Host Header”. This is exactly why we added video.geuer-pollmann.de to the custom host names in Azure.
The “Content Provider Code” (CP Code) is set to whatever you need for proper Akamai billing. For the uninitiated, a CP code seems to be an Akamai construct like a cost center, which allows you to group costs for a particular client under that CP code. So all costs related to a CP code show up together in your Akamai bill.
</img>
Start up the engines
After that long configuration spree, we’re pretty much set. The only thing missing is to actually enact the configuration, and to tell Akamai to “start up the engines”. When we look up in our Akamai “Property Version Information”, we see that the “Production Status” and “Staging Status” are set to INACTIVE.
The production system is the world-wide set of CDN edge nodes. Changes and reconfigurations to the production system certainly take a bit longer to propagate globally. It is a good idea to first test the waters with the staging environment; the staging environment is a small set of machines which enact config changes much faster, and are not indended to be hit by production traffic. When you see an *.akamaized.net hostname, it is production. When you see *.akamaized-staging.net, well, you get the idea.
To turn on staging, you switch to the “Activate” tab …
</img>
… and activate “Staging”
</img>
Test the staging environment
After we turned the staging environment, it is available at video.geuer-pollmann.de.akamaized-staging.net. Let’s say we have an asset in Azure Media Services, and when we open the URL of the HLS manifest in Safari, we can play it:
Problem is, it doesn’t work. The Akamai edge nodes in the staging environment correctly connect to mediaservice321.streaming.mediaservices.windows.net, but if you remember, we said ForwardHostHeader == IncomingHostHeader. So the edge node sets the http Host header to Host: video.geuer-pollmann.de.akamaized-staging.net. And our origin only accepts requests for either mediaservice321.streaming.mediaservices.windows.net or video.geuer-pollmann.de.
A little trick helps: We figure out the concrete IP address of one of the staging servers:
$ dig @8.8.8.8 +noall +answer video.geuer-pollmann.de.akamaized-staging.net
video.geuer-pollmann.de.akamaized.net. 21599 IN CNAME a1612.w10.akamai-staging.net.
a1612.w10.akamai-staging.net. 19 IN A 165.254.92.136
a1612.w10.akamai-staging.net. 19 IN A 165.254.92.138
Then we basically use Notepad/vim/Emacs/SublimeText to edit our /etc/hosts or C:\Windows\System32\drivers\etc\hosts file, and force our local laptop to send requests to the vanity host video.geuer-pollmann.de to one of the staging network nodes, such as 165.254.92.136. Then we open the production URL in Safari, and voila.
If that looks good, we revert our messing around in the hosts file; otherwise, we might experience hard-to-debug problems on our development machine :-).
Turning on production
Last step would be to turn on the production system, give it some time, and check if your DNS entries chain up correctly:
$ dig @8.8.8.8 +noall +answer video.geuer-pollmann.de

video.geuer-pollmann.de. 3599 IN CNAME video.geuer-pollmann.de.akamaized.net.
video.geuer-pollmann.de.akamaized.net. 21599 IN CNAME a1612.w10.akamai.net.
a1612.w10.akamai.net. 19 IN A 2.16.62.49
a1612.w10.akamai.net. 19 IN A 2.16.62.57
Hope you have fun… If you like that post, give it a retweet on Twitter, or comment below.
For fault tolerance, you deploy multiple virtual machines, such as a the frontend nodes, into an availability set. You use the copyIndex() function for looping through the cluster
From a fault tolerance and performance perspective, putting all frontend VM VHD files into a single storage account is a bad idea.
This article describes how you can declaratively distribute the OS disks across multiple storage accounts.
Intro
Azure Resource Manager is Microsoft Azure’s new declarative mechanism for deploying resources, so instead of writing a complex imperative script and firing a large amount of management operations against the Azure Service Management REST API, you describe the overall deployment in a JSON file,
The file LinuxVirtualMachine.json contains an ARM template which deploys the following resources:
A virtual network to put all VMs in
An availability set for all VMs
7 virtual machines and their associated network interface cards, and
2 storage accounts for the OS disks of the virtual machines.
An ‘availability set’ is a mechanism to force Azure to distribute the VMs which belong to the availability set across multiple “fault domains” and “upgrade domains”. Each of the 3 fault domains has own power supplies, networking gear, etc., so that a power outage for instance only impacts all VMs in that one fault domain.
Sharding across storage accounts
To function properly, each “virtual machine” needs to have an “OS disk”, which is stored in a “storage account”. Azure storage accounts have an availability SLA of 99.9% for locally redundant storage (LRS). Virtual machines running in an availability set have an SLA of 99.95%. It becomes clear that having highly available virtual machines, but then putting all eggs into one basket, eh, all OS disks into the same storage account, is a bad idea.
In addition to the availability issue of a single storage account, we also should distribute OS and data disks for performance reasons. When you read the Azure Storage Scalability and Performance Targets, you see the recommendation that you should put a maximum of 40 ‘highly utilized’ VHD disks into a regular (non-premium) storage account. So sharding helps both with HA and load leveling.
The solution
In that JSON template file, the three parameters are adminUsername, adminPassword are self-explanatory. The deploymentName parameter will be used as prefix for all sorts of naming, such as being a prefix for the (globally unique) storage account name.
The variables section contains values derived from the deploymentName parameter, and some constants, such as the instance count for the frontend nodes (the VMs). Noteworthy here is the math.modulo2 helper array, which we’ll see in action later.
One tip for deriving storage account names from user-supplied strings is to do at least some input sanitization. Above, you see that I call the `replace(deploymentName,'-','')` function to trim away dashes. Azure storage accounts do not like dashes and symbols in their name. Until ARM templates provide some RegEx'ish input handling, I at least trim the `-` symbols away.
The interesting part of the JSON template is in the virtual machine description. The copy.count value retrieves the instance count from the variablessection: [variables('instanceCount').frontend], which means that the template is expanded 7 times. The concrete value of the iteration is returned by the copyIndex() function, which returns 0, 1, 2, 3, 4, 5 and 6 respectively.
The properties.storageProfile.osDisk.vhd.uri has a value, which needs some explanation, indented for better redability:
[concat(
    'http://',
    variables('storageAccountNames').frontend,
    variables('math').modulo2[copyIndex()],        <-- Here we use copyIndex() as
    '.blob.core.windows.net/vhds/fe-',                 indexer into our math helper
    copyIndex(),
    '-osdisk.vhd'
    )]"
All disks of VMs with an even number end up in storage account test123fe0, all odd OS disks end up in test123fe1. The URLS of the resulting seven OS disks are shown here:
Azure Resource Manager contains a bunch of functions, such as the concat() function for concatenating strings.
Since August 2015, it also contains a mod()function for computing the modulus, but I haven’t been able to get that to work. I tried various combinations, such as
but none of those worked. Therefore, I decided to stick with my own approach for the time being
Having the math helper "variables": { "math": { "modulo2": [ "0", "1", "0", "1", "0", "1", "0", "1", "0", "1", ... ] } }
and then using that array to ‘compute’ the %2: [variables('math').modulo2[copyIndex()]]
Nevertheless, my preferred approach would be to have a storageAccountShardingCount variable which contains the number of storage accounts to spread the load over, and then use mod(copyIndex(), variables('storageAccountShardingCount')) to compute the respective storage account, like in this sample. Unfortunately, this currently gives me
Error submitting the deployment request.
Additional details from the underlying API that might be helpful:
Deployment template validation failed:
The template resource '...' at line '..' and column '..' is not valid.
Template language expression "mod(copyIndex(), variables('storageAccountShardingCount'))"" is not supported..'
Demo time
If you want have a look yourself, check the LinuxVirtualMachine.json file, which contains an ARM template, or deploy it into your Azure subscription by clicking below button. It will prompt you for an admin username and password, and a prefix string for naming the resources, and than launch 7 Standard_A0 instances (extra small, just for the sake of the argument):
After clicking the button, you’re signed into the Azure portal, and you can provide your own parameter values:
If you choose so, you can review my template and make modifications:
Choose some new resource group, as you’ll want to delete all the demo content later in a single shot.
For some reasons, you need to acknowledge the “buy” operation
After resource creation, you can drill into your resource group, and see the 7 VMs, two storage accounts, and all the other things:
When you drill into one storage account, the blob service, and the vhds container, you can see the OS disks.
This article explains how to securely, and with little effort, expose files in Azure Blob Storage towards the Akamai content delivery network. A proxy app (based on ASP.NET Web API), running in an Azure Cloud Service, checks G2O authentication headers, and then either redirects the CDN to the storage service directly, or fetches the data from the back.
The end-to-end solution is available here: https://github.com/chgeuer/G2O2AzureBlobStorage
Introduction
In this proof-of-concept, we’re going to integrate two pieces of technology together: Microsoft Azure Blob Storage, and the Akamai Content Delivery Network.
Microsoft Azure Blob Storage
Microsoft Azure Blob Storage is an object store, where you can create one or more storage accounts. Within an account, you can create containers, and store files such as images or videos as ‘block blobs’ ) in these ‘containers’. In the picture below, you can see three storage accounts, chgeuerwe123, cdndatastore01, and cdndatastore02.
A container can be publicly accessible (so that an unauthenticated GET requests are permitted) or the container can be locked down to be private (which is by default), so that only authenticated requests are permitted. Authentication comes in two flavors:
You can use one of the two storage account keys, and use the Azure REST API or one of the SDKs to access the private contents. Essentially, the requestor needs to supply one of the master keys as part of the request. The storage account keys are obviously confidential, and should not leace your application.
‘Shared Access Signatures’: In situations where you want to give external requestors access to a blob in a private container, you can create a so-called ‘shared access signature’ (SAS), which can be appended to the URL of the blob (or other resource, and which implicitly authorizes the request. In addition, an SAS can be an ad-hoc signature, or it can be associated with a policy. Simply speaking, you cannot easily revoke an ad-hoc signature, but you have to change the storage account key. An SAS which corresponds to a policy can be revoked by deleting the policy.
Below you can see the two storage account keys associated with ‘cdndatastore01’.
Let’s say we have two containers called ‘public’ and ‘private1’ (which are, well, publicly accessible and privately locked down), and various blobs in these storage accounts:
The ‘public’ container in storage account ‘cdndatastore01’ contains a file ‘data/somePublicImage.jpg’
The ‘private1’ container contains a file ‘someLockedDownImage.jpg’
When we look at the URL of a blob, it consists of the following parts:
Protocol: You can access Azure Blob Storage both through ‘http’ and ‘https’
Hostname: Each storage account has a unique hostname (http(s)://cdndatastore01.blob.core.windows.net in our case)
Container: The Container name comes after the hostname https://cdndatastore01.blob.core.windows.net/public/
Blob name: You can model a directory hierarcy inside a container by putting / characters into a blob name. Most tools support the illusion of folders. When I use a tool such as CloudXPlorer to look at my files, I see this:
For details around shared access signatures, check out these greatarticles. Suffice to say, that I added a policy to my container with the identifier g2o, which you can see being referenced in the &si=g2o part of my SAS.
The Akamai CDN
A content delivery network (CDN) is a large network of HTTP cache servers, distributed around the globe. When you fetch a file from a CDN, the DNS routes you to the nearest ‘edge node’ or ‘edge server’ in the CDN. If not already cached, this edge node then fetches the original file from the ‘origin server’. This origin server usually is some web server where the original file assets are stored.
In Azure, there are various services where it can make sense to deploy a CDN in front, to reduce traffic on these servers: Compute services such as Azure Cloud Services, or Virtual machines, Azure Media Services Origin Servers, or Azure Blob Storage.
The term ‘G2O’ stands for ‘ghost to origin’ or ‘global host to origin’ authentication, and is a mechanism for enabling an origin server to authenticate the inbound request from the CDN’s edge node (ghost). As I said, Azure Media Services support G2O, as well as other libraries (such as the G2O module for nginx or the an IIS Module from the Akamai Community). In essence, G2O defines HTTP headers which have to be added to the request, and 5 different cryptographic algorithms to compute these headers.
The X-Akamai-G2O-Auth-Data header contains the ID of the cryptographic algorithm (1-5), the IP addresses of the edge node and the actual requesting client, the current time (as UNIX epoch), some unique ID to prevent replay attacks (which usually is called ‘nonce’ in the security community), and a ‘nonce’ (which is called key identifier in the security community).
After cryptographically processing the input from the X-Akamai-G2O-Auth-Data header and the URL’s local path with the cryptograhic key associated with the ‘nonce’, the resulting cryptograhic value is tranported in the X-Akamai-G2O-Auth-Sign header. (I resist to call is a ‘signature’ because it is a symmetric system, not offering data origin authentication, just message integrity and peer entity authentication.)
The five G2O algorithms are based on pretty ‘conventional’ crypto, but for just keeping the egress load on origin servers low, it’s certainly OK. Have a look at my test vectors for how these strings look like.
After defining the protocol foundation, we can now focus on the actual solution:
Interaction flow
</img>
Simply speaking, we deploy an SAS generator proxy app. Then in Akamai, we configure our SAS Generator Service as origin, and turn on “Redirect Chasing”. When clients get a file from the CDN, the edge servers attempt to fetch the files from our SAS Generator Service, which authenticates them using G2O and redirects them to blob storage, with an SAS URL.
The first step in the flow is the user’s browser making a DNS query for cdn.customer.com against the customer’s DNS Server. The DNS Server returns CNAME or A record the edge node a123.g2.akamai.net.
The client’s browser sends a GET request against the edge node and retrieves the resource /images/public/data/somePublicImage.jpg.
The edge node sends a GET request against the CNAME of the configured origin, like contosoorigin.cloudapp.net but with a Host header of cdn.customer.com, retrieving the resource /images/public/data/somePublicImage.jpg. From the CDN’s point of view, contosoorigin.cloudapp.net is a full origin server, hosting the content. From an implementation perspective, contosoorigin.cloudapp.net is just a tiny ASP.NET WebAPI Controller which does a few things: It
validates the G2O Headers to make sure the called is indeed the CDN,
extracts the first segment of the URL path (/images in our example), and checks whether there is a storage account associated with this alias,
extracts the second segment of the URL path (public in our example), and checks whether the this container is actually exposed in config
generates a SAS URL for the real Azure Blob Storage Account (without the images part), and returns an HTTP 302 Redirect back to the CDN.
As a last step, the URL’s scheme (http or https) must match the one of the inbound request, an important detail for the next step to work.
After the CDN’s edge node receives the 302 redirect response, it checks two things:
The configuration at Akamai must have “Redirect Chasing” enabled, otherwise the edge server refuses to follow that redirect.
The scheme of the 302 Response (with or without TLS) must be equal to the origin requests scheme, otherwise the AkamaiGHost sends you a fancy “404 An error occurred while processing your request”.
Now the CDN edge node uses the 302 address to retrieve the actual contents from CDN. This request is now validated by Azure Blob Storage using the shared-access-signature magic.
Akamai Configuration
</img>
Implementation details
G2O OWIN Middleware
The G2OHandlers project contains a full-fledged OWIN Middleware for handling G2O authN.
In order to check whether an inbound http request is permitted, the OWIN middleware needs access to the cryptographic key material. You must supply a Func<string,string> keyResolver handler, which gets an Akamai ‘nonce’ (key identifier like "193565") as input, and returns the key (like "07bf84629be85d68a3ef343d").
As a result, the G2OAuthenticationHandler.cs issues an AuthenticationTicket with various claims containing all the G2O validation data. The ClientIP, i.e. the IP address of the actual client itself, is currently not validated, but the implementation could easily be extended to support geo-fencing scenarios (if you believe an IP address still has meaning in this century).
// Use https://raw.githubusercontent.com/chgeuer/WhatIsMyIP/master/WhatIsMyIP/ExternalIPFetcher.cs// for determining my own IP address. Sorry, I'm in the home office behind a NAT ...varpath="/images/public/data/somePublicImage.jpg";varoriginUrl="http://contosocdn.cloudapp.net"+path;varg2oClientHandler=newG2OHttpClientHandler(version:3,// 1..5edgeIP:ExternalIPFetcher.GetAddress().IPAddress.ToString(),clientIP:"1.2.3.4",// harrr harrr :-)nonce:"193565",nonceValue:"07bf84629be85d68a3ef343d");varclient=newHttpClient(g2oClientHandler);varresponse=client.SendAsync(HttpRequestMessage(HttpMethod.Get,originUrl)).Result;
With this baby, you can simply impersonate a CDN edge node for debugging purposes.
ExternalIPFetcher for simulating G2O clients
One aspect hidden in the above code is this ExternalIPFetcher fluff: I often work from home (behind a slooow DSL line), and only god knows what IP address my router externally. All these ancient protocols (such as FTP), and security folks stuck in a last-century mindset, believe that using IP addresses for authZ purposes is a cool idea. Given that I cannot change the world in this regard, I understood I have to have a way to get my own IP address. In my WhatIsMyIP/ExternalIPFetcher.cs repo, I have a small utility class which you can just include per T4Include. Given that I need to pretend that I’m a CDN edge node, I must include the edge’s IP address in the signed data, therefore the above code needs to determine my IP.
For those who care what I do there, I simply fire off 10+ http requests to various whatismyip/checkip/letmeknowmyip/idontgiveashit services on the Internet, and whoever returns first is my authoritative answer, no voting or double checks. Sounds pretty secure, hm?
Hosting the proxy
The solution comes in two flavors, PaaS and IaaS. The proper way to run this is to deploy an Azure Cloud Service with the G2OWorkerRole and have peace of mind, multi-instance across fault domains, and update domains, etc. For the old dogs (whom I can’t teach PaaS tricks) or for developers who simply want a console.exe to step through, there’s the G2OSelfHost option.
Configuring the whole thing
Below you can see the snippet how we need to configure the solution. You need to set the g2o_nonces and the g2o_storage strings (either in the cloud service’s cdcfg file, or in the <appSettings> of the app.config):
In the same way how Azure Storage supports multiple keys (we call these ‘primary’ and ‘secondary’), G2O authentication also foresees multiple ‘nonces’:
Having multiple symmetric keys valid at the same time enables you to do some poor-man’s key management, where you roll over between different keys. The g2o_nonces string is a JSON object, which just maps nonce values (key IDs) to the keymaterial, which is in this semi-hexadecimal form.
g2o_storage
The g2o_storage JSON string is an array of JSON objects:
The Alias property allows you to map the first segment from the URL to a storage account.
The ConnectionString property contains an Azure storage connection string
The Containers property is a string[] array, listing all containers which you’re willing to expose. Whether a container is public or private doesn’t matter, given that we generate SAS URLs anyway. If you have a public container, but it isn’t listed under the Containers property, it is not accessible via CDN.
The ASP.NET WebAPI CDN Controller
302 Redirect
The CdnController implementation is actually quite straightforward. The [Authorize] makes sure we enforce G2O authN. We crack the URL into different segments (alias to determin storage account, container, and the blob path), check that the storage account and container are listed in config, and then issue the SAS URL.
The enforceProtocolEquality stuff is related to the way how ‘redirect chasing’ decides whether it follows redirects. When running on the local development fabric, we must keep the TCP ports where they were, instead of using default ports.
[Authorize]publicclassCdnController:ApiController{privateIHttpActionResultGetRedirect(stringsegments){string[]pathSegments=segments.Split(new[]{"/"},StringSplitOptions.None);stringalias=pathSegments[0];stringcontainerName=pathSegments[1];stringpath=string.Join("/",pathSegments.Skip(2));// var userId = this.User.Identity.Name; // always Akamai// var nonce = ((ClaimsIdentity)this.User.Identity).Claims.First(// claim => claim.Type == G2OClaimTypes.Nonce);varstorage=this.G2OConfiguration.Storage.FirstOrDefault(_=>_.Alias==alias);if(storage==null){returnNotFound();}if(!storage.Containers.Any(_=>_==containerName)){returnNotFound();}varblobClient=storage.CloudStorageAccount.CreateCloudBlobClient();varcontainer=blobClient.GetContainerReference(containerName);// var sasAdHocUri = ContainerUtils.GetSASAdHoc(container, path, validity: TimeSpan.FromMinutes(55));varsasPolicyUri=ContainerUtils.GetSASUsingPolicy(container,path,validity:TimeSpan.FromDays(31));boolenforceProtocolEquality=storage.CloudStorageAccount!=CloudStorageAccount.DevelopmentStorageAccount;varredirectUri=enforceProtocolEquality// redirect scheme must be equal to inbound protocol?newUriBuilder(sasPolicyUri){Scheme=this.Request.RequestUri.Scheme,Port=-1}.Uri:sasPolicyUri;returnRedirect(redirectUri);}
200 OK
The CdnController implementation also contains an unused one which directly reaches into blob storage, and retrieves the actual contents from there, instead of redirecting the edge node to blob storage.
Summary
When you want to use Akamai CDN for streaming videos, you should definetely consider an Azure Media Services Origin service, given the bandwidth SLAs of that service. In scenarios where you want to expose other assets directly from blob storage to the Akamai CDN, I hope this litte article helps you.
In case you bump into issues, feel free to reach out on twitter/chgeuer or on github, or leave a comment below.
When I develop an Azure cloud service (PaaS), I often have setup scripts which need to run. Usually, these scripts generate some form of output on STDOUT and STDERR, which I’d like to capture somewhere. So the easiest way would be to write that output to some fixed location, such as C:\logs and grab it from there.
The problem with this approach is that it doesn’t work well in the development fabric, i.e. when I simulate multiple WebRoles or WorkerRoles on my development laptop, cause all scripts running in parallel, writing to the same folder, isn’t a great idea. I wanted a solution where the real setup script simply spits out log data to the console, and where that output is written to a unique directory.
In this sample, you can see that this unique directory is a folder like C:\log-deployment25(0).TableLoggingCloudService.WorkerRole_IN_3, where the folder name contains the deployment ID and instance ID, and a new log file for each execution of the setup script (for instance, after a machine reboot).
You can have a look at my github project for a sample implementation.
</img>
Implementation
The solution uses a chain of 4 batch and PowerShell scripts to achieve this goal. Maybe it’s over-engineered, but I couldn’t come up with a simpler solution:
First, the csdef file lists a startup task for commandLine="SetupScripts\install.cmd"
The batch file install.cmd launches the PowerShell script install.ps1
install.ps1
determines deployment ID, role instance ID,
derives logfile names,
sets local environment variables accordingly
kicks off install2.cmd
install2.cmd starts install2.ps1 (the actual workhorse), redirecting STDOUT and STDERR to the proper logfile
install2.ps1 does whatever it has to do, simply spitting out data to STDOUT
CloudService/ServiceDefinition.csdef
First, the csdef file lists a startup task for commandLine="SetupScripts\install.cmd".
The batch file install.cmd launches the PowerShell script install.ps1
REM WorkerRole/SetupScripts/install.cmdcd/d "%~dp0"%SystemRoot%\System32\WindowsPowerShell\v1.0\powershell.exe -ExecutionPolicy Unrestricted-File "%~dp0install.ps1"exit/b 0
WorkerRole/SetupScripts/install.ps1
determines deployment ID, role instance ID,
derives logfile names,
sets local environment variables accordingly
kicks off install2.cmd
# WorkerRole/SetupScripts/install.ps1[void][Reflection.Assembly]::LoadWithPartialName("Microsoft.WindowsAzure.ServiceRuntime")if(![Microsoft.WindowsAzure.ServiceRuntime.RoleEnvironment]::IsAvailable){Write-Host"Not running in fabric, exiting"return;}$drive="C"$prefix="log-"$logfolder="$($drive):\$($prefix)$([Microsoft.WindowsAzure.ServiceRuntime.RoleEnvironment]::CurrentRoleInstance.Id)"
$logfilename = "$($logfolder)\$([System.DateTime]::UtcNow.ToString("yyyy-MM.dd--HH-mm-ss-fff")).txt"if(-not(Test-Path-Path$logfolder)){[void](New-Item-ItemTypeDirectory-Path$logfolder)}[System.Environment]::SetEnvironmentVariable("$logfolder",$logfolder)[System.Environment]::SetEnvironmentVariable("logfilename",$logfilename)Start-Process-NoNewWindow-Wait-FilePath"$($Env:windir)\System32\cmd.exe"-ArgumentList"/C $(Get-Location)\install2.cmd"
WorkerRole/SetupScripts/install2.cmd
install2.cmd starts install2.ps1 (the actual workhorse), redirecting STDOUT and STDERR to the proper logfile (> %logfilename% 2>>&1)
REM WorkerRole/SetupScripts/install2.cmdcd/d "%~dp0"%SystemRoot%\System32\WindowsPowerShell\v1.0\powershell.exe -ExecutionPolicy Unrestricted-File "%~dp0install2.ps1">%logfilename%2>>&1exit/b 0
WorkerRole/SetupScripts/install2.ps1
install2.ps1 does whatever it has to do, simply spitting out data to STDOUT (via Write-Host)
# WorkerRole/SetupScripts/install2.ps1[void][Reflection.Assembly]::LoadWithPartialName("Microsoft.WindowsAzure.ServiceRuntime")if(![Microsoft.WindowsAzure.ServiceRuntime.RoleEnvironment]::IsAvailable){Write-Host"Not running in fabric, exiting"return}$logfolder=[System.Environment]::GetEnvironmentVariable("$logfolder")Write-Host"All my STDOUT goes to $($logfolder)"Write-Host"Doing some stuff"[System.Threading.Thread]::Sleep(1000)Write-Host"Doing other stuff"
Of course, don’t forget to mark all the setup files with “Copy Always” in Visual Studio’s file properties :-).
Whenever I log on to a fresh Windows VM (in Azure) to do debugging, I’m missing my favority tool chain, stuff such as Internet Explorer in a usable mode (not locked down to server), Sublime Text2, or Process Explorer. After going through the installation pain too often, I decided to optimize that flow:
Have an installation script, versioned in Github
Use the Chocolatey approach to kick the tires
To get the magic going, on my laptop, I navigate to https://github.com/chgeuer/AzureConvenience and copy the text at the bottom into the clipboard
Then in the RDP session, I copy the text into a command window, and wait. It uses PowerShell to download my AzureConvenience.cmd batch file, which in turn instally my favorite tool chain. The rest of this post goes though the contents of that batch file.
Tool chain
Bring Internet Explorer into a usable shape
This is a copy/paste from DisableIESecurity script from Richard Astbury.
This post briefly touches on how to access a Windows 8.1 machine’s file shares using a Microsoft Account. When I’m working from home, I like to listen to music which is stored on my private computer. Windows 8 seems to turn off the \\server\c$ admin shares, and I didn’t really understand how the whole Microsoft Account thing fits with SMB shares.
Turn on file sharing (admin shares) on Windows 8
To turn the admin share c$, d$ etc. back on, you need to set/create the LocalAccountTokenFilterPolicy registry setting:
Simply speaking, the SMB user name for the Microsoft account christian@outlook.de becomes MicrosoftAccount\christian@outlook.de by prefixing it. For instance, you can now run
NET USE X: \\192.168.0.5\c$ /USER:MicrosoftAccount\christian@outlook.de
TL;DR - When you generate QR codes which contain sensitive (confidential) information, do not use an external service to render the QR code images, but by all means, do it yourself. All your future users will thank you for not leaking their most important long-term credential.
the basics
Yesterday, I tried 2-factor authentication (2FA) using the Windows Phone Authenticator app, and wondered how the overall system worked: Basically, it is an implementation of the RFC6238 - TOTP: Time-Based One-Time Password Algorithm spec, which takes the UNIX epoch time in seconds modulo 30, and uses the rounded seconds and a symmetric key to derive a time based hash, and takes some bits from the resulting hash as integer-based PIN.
For UX reasons, the symmetric key is imported into the Authenticator app via a QR code. The content of the QR code is a URI like otpauth://totp/Microsoft:user%40outlook.com?secret=AAAABBBBCCCCDDDD. In this sample, the string Microsoft:user%40outlook.com is a textual identifier of the symmetric key (without any cryptographic significance), and the string AAAABBBBCCCCDDDD is the symmetric (secret, i.e. highly sensitive and confidential!!!) key, in BASE32 encoding, i.e. just case-insensitive text and decimal digits. The QR code, displayed on screen once, and scanned by the mobile phone app, is a convenient and ephemeral mechanism to securely transfer the credential.
The QR code contains (by design) the probably most sensitive information a user has: the cryptographic long-term key for a proof-of-possession token. The previous use of an external site for rendering sensitive QR codes has multiple problems:
The app forces the user’s browser to send the credential (the query string for the QR code generator) across an unencrypted (http) connection.
The site (qrcode.kaywa.com) has no security relationship with the sample code. It cannot be trusted.
The HTTP GET operations are most certainly stored long-term in the qrcode.kaywa.com web site logs. Whoever is behind the kaywa.com domain in Zürich, I’m sure they have plenty of keys in their web server logs now. Hmmm, yummie.
Don’t do that :-/. Don’t get me wrong: I’m not saying qrcode.kaywa.com is evil. I am just saying “do not use some random 3rd party service for generating security-critical QR codes”.
one possible solution
For pure browser-based QR code generation, a quick search surfaced two JavaScript libraries, neocotic/qr.js (which is GPL3 licensed) and davidshimjs/qrcodejs (which is MIT licensed). In the QRCodeInHTML repository, I played around with generating QR codes purely in a web app. You can try it out here.
TL;DR - The LargeFileUploaderUtils.cs file in the associated repository (https://github.com/chgeuer/AzureLargeFileUploader) contains a C# upload helper class for Azure blob storage which supports resuming broken uploads, can upload multiple blocks in parallel, and is robust in the sense that you can pull the network cable during the upload, and when connectivity is restored, it just continues.
Azure Blob Storage Uploads - An Introduction
A customer of mine needed to upload Mezzanine files, i.e. large video files in the 200+ GB-range, to Azure blob storage. While I appreciate the nice GUI which tools such as CloudXplorer provide me with, when it comes to handling gigantic files, these GUI tools can die in the middle of the action. My customer, sitting in some office with potentially unreliable Internet connection, wanted to upload the files across the weekend, so I was in need for a rock-solid upload process. This blog article describes the small upload utility I came up with.
When you need to upload blobs (files) to Azure blob storage, under the hood this upload uses Azure Storage’s REST API, in particular the PubBlock() and PutBlockList() functions. When you ever tried to upload a larger (couple Megabytes) file through a HTTP POST from your browser, you know there’s nothing more annoying than an upload which breaks at 97%… Therefore, the Azure Storage team decided to ensure large assets are uploaded in smaller pieces. Simply speaking, you chop your file into smaller pieces, and then upload the individual pieces (each with a specific number) through the PutBlock() function, and when all pieces are successfully uploaded, you commit these using the PutBlockList() function. When Azure blob storage receives the information in which the pieces fit together, it puzzles the whole thing together, and the real file materializes in blob storage.
Chunk size
The problem with the previously mentioned broken upload is that you basically waste precious bandwidth and time when the network causes the upload to break. Uploading in larger chunks has the advantage that the overhead of establishing a TCP session is minimized, but that happens at the higher probability of the upload failing. Smaller upload chunks have the advantage that each upload has a higher chance of happening successfully, but at the cost of more HTTP requests and the associated TCP session establishment overhead. The maximum size of an uploaded block in Azure storage is 100 MB. That limit was 4MB in the past, but that limit was upgraded with API Version 2016-05-31 (see the docs).
We’re talking ‘Block’ Blobs
Azure blob storage supports two different types of blobs, page blobs and block blobs:
Usually, a page blob is something like a virtual harddisk (a .VHD file in Microsoft lingo). The important thing about page blobs is that they can contain fewer information that the overall size, i.e. the stored information in the file can be spares. If you imagine a harddisk, while the harddisk may have 1TB in size, the used space could be 200GB. When you want to upload page blobs, please refer to tools such as csupload.exe.
A block blob is what you usually expect a file to be, full with information from the beginning through the end. The upload pieces or chunks mentioned earlier are these blocks.
The implementation
Integrity protection
When a single block is uploaded through the PutBlock() operation, the client needs a mechanism to ensure the stored data is equivalent to the sent data. We achieve this by calculating an MD5-checksum of the block, and sending it alongside with the payload. When receiving the payload, the Azure storage service re-calculates the checksum on its side, and only stores the blob when the client-sent and service-side re-calculated values match. Otherwise, the client receives an error indicating that the transfer was faulty.
Resuming a previous upload
Resuming an upload allows the client to re-start the upload at a later time, maybe after an application crash, a machine reboot or when network connectivity is restored.
Each blob in Azure storage has a name, such as “movie.mp4”. So all uploaded blocks belong to “movie.mp4”. In order to differentiate between the different uploaded blocks, each block also must have a unique block ID. When we need to resume a broken transfer, we can use this block ID track which blocks have been uploaded previously: The DownloadBlockList(BlockListingFilter.Uncommitted, ...) function allows us to retrieve a list of all blocks which are already in Azure storage, but which have not yet been amalgamated to the final blob.
To implement resume, we first determine which blocks exist in the local file:
In this code, NumBytesPerChunk denotes the block size. Imagine you have a file with 3006 bytes, and the NumBytesPerChunk was 1000, then you would have 4 blocks, three blocks with 1000 bytes each, and a last block with 6 bytes.
The BlockMetadata type is a local data structure to keep track of some management information.
Now that we know (in allBlockInFile) the total amount of information which should end up in the cloud, we can determine which blocks are already uploaded, and therefore, which are missing:
The blockBlob.DownloadBlockListAsync(BlockListingFilter.Uncommitted, ...) call fetches a list of already existing, uncommitted blocks for our file, if any.
Here, we filter on the length of the blocks, ensuring that all already existing blocks have the same size as our desired upload size. This ensure that - if an upload resumes with a different block size - we start from scratch. So better do not change upoad size in the middle of the action.
Finally, we take the list of all blocks in the file, remove those blocks which are already uploaded, resulting in the list of missing blocks. The ugly try/catch block is necessary because if there are no blocks at all, the blockBlob.DownloadBlockListAsync() call throws a StorageException (instead of an empty list).
Uploading the actual blocks
After we have determined which blocks need to be uploaded, we define a uploadBlockAsync() closure which
loads the block contents from disk,
computes the MD5 checksum, and
uses the ExecuteUntilSuccessAsync() function to call blockBlob.PutBlockAsync() until it worked.
After defining this utility function, we use the LargeFileUploaderUtils.ForEachAsync() function to call uploadBlockAsync() for each of the missing blocks. You can imagine LargeFileUploaderUtils.ForEachAsync() to be like Parallel.ForEach() but with async/await support.
Looking a bit more into the details, you might observe a couple of ‘interesting’ code:
MD5 generation
stringcontentHash=md5()(blockData);
The client needs to compute the MD5 checksumm of the byte[] array with the block contents. Given that this code might run in different tasks in parallel, we need to ensure each parallel execution has it’s own unique MD5 object. The md5() function returns a function with a fresh unused MD5 object which does the actual computation for us.
One of the goals of this utility is that I can pull the network cable in the middle of the action, and - as soon as networking is restored - the upload continues. To achieve this, I wrote ExecuteUntilSuccessAsync() as a small utility which basically swallows all exceptions, and just retries (brute-forces) until it worked. The caller needs to supply the action which should be executed. But given that we’re in async/await land, we need to supply a Func<Task> instead of a syncronous Action.
One concept which is not used here (yet) is that of slowing down the retries, such as through a Task.Delay(), optionally with an exponential backoff. In general, it’s a good idea to give the system some time to relieve the stress if something went wrong, rather than hitting it again immediately after.
Being able to brute-force, i.e. just retry until it works, is one of the beauties which is given to use by Azure Storage and the strange concept of idempotence, which Wikipedia cites as “operations that can be applied multiple times without changing the result beyond the initial application”. Or simply speaking, just hit it with a hammer until it worked.
Statistics
You might have already seen that there is also a primitive statistics class, which basically keeps track of progress and remaining time. Given that I am usually interested in progress since I started the program, the statistics to not refer to the overall file (all blocks), but to the remainder (missing blocks), so that when you re-start the program after an interruption, the overall upload size is reduced.
Finishing the upload
In the last step, we finish the upload by calling blockBlob.PutBlockListAsync(), which assembles the actual block blob. After this step, the file is available for download.
I decided against making a NuGet package out of this; this is basically one C# file, and it’s quite easy to include it in your solution.
When you launch the NuGet Package Manager, there is a quite helpful package called T4Include. This package gives you an Include_T4Include.tt file. In this file, we refer to the C# file with our uploader on Github. Whenever you save this .tt file, the T4 engine reaches out to Github and downloads the most recent version of the uploader into your solution. Such a T4 file looks like this:
<#
  RootPath    = @"https://github.com/";
  Namespace   = "notinuse";
  Includes    = new []
  {
    Include (@"chgeuer/AzureLargeFileUploader/raw/master/LargeFileUploaderUtils.cs",
               noOuterNamespace: true)
  };
#>
<#@ include file="$(SolutionDir)\packages\T4Include.1.1.2\T4\IncludeWebFile.ttinclude" #>
In this code, you can see the URL where T4 retrieves the C#-code from, and you see noOuterNamespace: true, which instructs T4Include to include the C#-code without wrapping or nesting it in another namespace.
So now in your own solution, you can simply call the utility function like so:
I forgot to mention, the uploadParallelism: 2 bit allows you to specify how many parallel HTTP requests you’d like to allow.
Powershell
Of course, you can also use Microsoft PowerShell for uploading files, although the code to load the Azure Storage bits is most certainly not yet as clean and neat as it should be.
Microsoft Azure’s IaaS ‘Virtual Machines’ feature allows customers to enrich machines with so-called ‘extensions’ at provisioning time. For instance, the BGInfo extension displays machine parameters (IP addresses etc.) on the admin’s desktop wallpaper. Extensions for Chef and Puppet allow automation in large IaaS deployments by controlling all the VMs from a central management instance.
In some cases, you may just want to inject some custom script into a fresh Linux or Windows machine. Sandrino Di Mattia wrote a nice introductory blog article about Microsoft’s so-called “CustomScript” extension. Basically, the extension get’s the address of a Powershell Script file, this script is downloaded upon machine startup and executed. For a customer engagement in the gaming industry, I needed a simple way to inject custom bits into a to-be-started VM, and I wanted to do that from the C#-side with the Microsoft Azure Management Libraries (MAML).
Doing it all from PowerShell
To test the waters first, I tried the Powershell route as well to ensure everything works in principle.
Setting the deployment variables
The first part is probably self-explanatory: Define machine names, machine sizes, etc. One thing I prefer is to keep actual credential information out of my scripts (and demos), so that the admin password for the Azure VMs is in an environment variable on my laptop. This ensures I do not accidentally ‘git push’ my password into a gist or so.
$vmname="cgp$([System.DateTime]::UtcNow.ToString("yyMMddhhmmss"))"$datacenter="West Europe"$adminuser="chgeuer"# passwords do not belong in version control :-)$adminpass=$env:AzureVmAdminPassword# ExtraSmall,Small,Medium,Large,ExtraLarge,A5,A6,A7,A8,A9,Basic_A0,Basic_A1,Basic_A2,Basic_A3,Basic_A4$instanceSize="Basic_A0"# security by obscurity$externalRdpPort=43379
Lookup of the VM image name
The names of VM images in Azure must be unique, but I prefer to keep these ephemeral-looking strings out of my script, and use something more verbose. This code helps me to lookup a concrete VM image name based on a human-understandable label:
# One from Get-AzureVMImage | select Label$imageLabel="Windows Server 2012 R2 Datacenter, May 2014"$imageName=(Get-AzureVMImage|`Where-ObjectLabel-eq$imageLabel).ImageName
Subscription Name lookup
In contrast to C#, on the Powershell side of things, we need to supply a “subscription name” to retrieve the proper Azure credentials, instead of a subscription (GUID) ID. Here, I prefer to have the ‘hard’ subscription ID in my code, cause my customer’s subscription names are not always very helpful:
Forgive that I use PowerShell’s word-wrap operator (backtick) to spread long command lines in this sample. Splatting is certainly better, but bear with me for the demo.
Determine VHD storage path
A reverse-lookup for ‘some’ storage account in the correct Azure region helps me to figure out where I want the OS Disk’s VHD to be placed. I prefer to name the OS Disk’s blob name individually, otherwise Azure chooses a disk name for me.
The next step is to upload the Powershell-Script which we want to run inside the machine to Azure blob storage (into a private container). To do so, we
create a local PS1 file on our laptop,
create the ‘scripts’ container in blob storage if necessary and
upload the script to the container.
For simplicity’s sake, I just took Sandrino’s mkdir-Script which takes a single parameter. Using this mechanism (having one script per VM), you can now customize these script contents with machine-specific deployment information. Given that the script will be stored in a private blob, you can also throw machine-specific, private information in there:
The actual magic of configuring the VM lies in the Set-AzureVMCustomScriptExtension call; by specifying -StorageAccountKey, -StorageAccountName, -ContainerName and -FileName, the stored Powershell file is downloaded from the private blob storage container onto the VM and called with -ExecutionPolicy Unrestrictedand the proper -Argument.
The interesting piece is the C# code from Program.cs which kicks off the deployment: It uses an X.509 certificate (stored in the LocalMachine\My store) to connect to Azure, upload the Powershell-snippet to blob storage, and launch the VM.
varpowerShellCode=@"
param($dir)
mkdir $dir
mkdir C:\testdir
";varagent=newScalingAgent(subscriptionID:"deadbeef-2222-3333-dddd-1222deadbeef",subscriptionManagementCertificateThumbprint:"A5596EA671EFFFFFFFFFFFFFFFFFFF88A5E4BF0F",storeLocation:StoreLocation.LocalMachine);awaitagent.LaunchVMAsync(vmname:string.Format("cgp{0}",System.DateTime.UtcNow.ToString("yyMMddhhmm")),imageLabel:"Windows Server 2012 R2 Datacenter, May 2014",datacenter:"West Europe",instanceSize:"Basic_A2",adminuser:"chgeuer",adminpass:Environment.GetEnvironmentVariable("AzureVmAdminPassword"),externalRdpPort:54523,powershellCode:powerShellCode,powerShellArgs:"c:\\hello_from_customscriptextension");
Inside the ScalingAgent.cs file, I use a fluent API implemented in ScalingExtensions.cs. After the Powershell-script is uploaded to the storage account, I can create a new Role object, which is then deployed using the computeManagementClient.VirtualMachines.CreateDeploymentAsync() call. The subsequent calls to AddWindowsProvisioningConfiguration(), AddInputEndpoint() or AddCustomScriptExtension() basically configure the Role.
On Microsoft’s //build2014 conference, Project Orleans had it’s public debut. You can watch the introductory video here, and also download the bits.
In Orleans, a grain can have state, and when the grain is activated or deactivated (removed from memory), this state is automatically loaded / stored. Method on the grain can also save the grain’s state to the underlying persistency provider when they think is a good time, e.g. when there were significant changes:
I was looking for a clean way to save the state on a regular basis, instead of during each invocation. This is done my a simple utility class, the ‘OrleansStatePersistencyPolicy.cs’: In my grain, I initialize this persistency policy. In this example, if there were fewer than 10 seconds before last invocation, the state is not saved:
Under azure-iconography, you can find an icon font, usable for the web, which is based on the Microsoft Azure icon set. I hope it is helpful when you blog about Microsoft Azure, as it includes all the symbols Microsoft provided.
For example, you can talk about web sites () or media services ().
For a full overview to the icons, check the reference sheet.
If you like it, please spread the word. If you don’t like it, let me know or whack the SVGs into fontastic.me youself.
Sochi Live Encoding, across multiple Azure regions, 2.1 million concurrent viewers
IaaS Developer Experience
IaaS Management capabilities (VM creation etc) from within Visual Studio
Interactively debug apps on an IaaS VM. Selecting “Debug” in Visual Studio dynamically enables a debugging agent in the VM
DevOps
Lauch “Puppet Enterprise” master server from the @MicrosoftAzure portal, and have “Puppet Enterprise Agent” or “Chef” dynamically injected into a VM instance
Puppet Enterprise: Less maintenance of golden images on IaaS. Bring IaaS story much closer to the Cloud Services experience which @MicrosoftAzure provides since 2009.
IaaS Announcements
Puppet Support and Chef Support
Autoscaling GA
Static internal IP addresses
Web Sites
Java apps on @MicrosoftAzure web sites
VIP swap and Staging Support on Web Sites
Web Jobs (background jobs)
GA of Traffic Manager for Web Sites
GA for autoscaling Web Sites
More SSL Endpoint (5-SNI and 1-IP SSL certificate) for WebSites customers
Mobile Services
Mobile Services support MongoDB and Azure Table Storage
Having a .NET backend in Mobile Services, authenticating with Active Directory, pushing records to SharePoint, and re-using the .NET business logic from the portable class library cross-platfrom with Xamarin on iOS
CDN Generally Available
Notification Support for Kindle
Microsoft Azure SQL Database
Maximum size goes from 150GB to 500GB
Automatic backups and self-service restore
Active geo-replication
HDinsight
Hadoop 2.2 support
NET 4.5 support
Audit and Operation history
Hive Query enhancements
YARN (yet another resource negotiator) support
Windows Azure Storage supports read-access to the secondary
Anders Heijlsberg on Roslyn
Roslyn Project will be open sourced @ http://roslyn.codeplex.com/
Other open source
Azure Resource Manager (Preview):
Visual Studio Online is now GA
Guggs
.NET MicroFramework continues to rock, becomes generics and improved perf
Azure Resource Management
“Resource Group” is the unit of management
Each “Resource” must belong to exactly on “Resource Group”
“Azure Resource Groups” - Rezepte, um Sites, Maschinen und Datenbanken skriptgesteuert hochziehen.
Chef/Puppet Support für Azure, um Maschinen-Inhalte sauber zu deployen
Java Support auf Azure WebSites (Jetty, Tomcat)
SQL Azure: (500 statt 150 GB), Backup/restore/snapshots
CDN Availability
WP8.1 action center, with SIM info, battery stats,
WP81 lock screen experience, how text elements and animations show.
WP81 start screen, show background photos through the tiles
Cortana. Speech assistant. powered by bing. has a notebook about the users preferences, interests, quiet hours, relevant people. First beta on US, then UK and china, then rest of the world.
skype update for WP81
cortana can be used to queue work 3rd party apps
WP81 enterprise geatures. VPN, S/MIME, MDM capabilities, such as prevemting locally saving files. Users in a BYOD scenario, as well as the IT depaartment, can delete the workplace connection.
WP81 store:
better calendar views (such as week view).
Wi-Fi Sense service suggests automatic connection sign-in to free hotspots. Also enables secure sharing of access to private hotspot with friends.
Ongoing phone call can be enriched with Skype video call-
shape writing keyboard is really cool.
roll out to consumers in a few month. new phones early may.
Windows 8.1 Update
April 8th in store
Universal Windows apps for Phones, Tablets and PCs (and XBox). One shared code base across devices plus tailoring for special form factors.
Open existing Windows 8.1 app and add a new device target, i.e. phone.
Use the context switcher to quickly see how a universal app XAML renders on tablet and phone.
Buy a universal app on the phone, and use it on the PC and vice versa. Same for in-app purchases, notifications etc.
Store submission 50x faster.
Modern Office
Fully optimized for touch. Rebuilt on DirectX for real snappiness
Gesturing (pinch) and inking in presentation mode
The modern Office is the poster child for universal apps (tablet and phone with the same app)
Enterprise development. Brokered componemt for side-loaded apps enable modern apps to talk to an old code base on the desktop side, such as ado.net app and SQL Compact.
IE11 on phone, tablet and PC. Support for WebGL demo, MPEG DASH,
Use WinJS for cross-platform development on Windows, Android and iOS, open sourced via MSOpenTech at github/winjs.
Universal apps will be able to run in a window on the desktop, and there’s something that rally looks like a start menu ;-)
An Xbox One and a 500$ gift card for the Microsoft store. Too bad not being a regular attendee ;-))
Nokia news
Stephen Elop on stage.
Windows Phone 8.1 will be shipped to each Lumia device running Windows Phone 8 today.
New colors (bright green, orange) for devices
New Lumia Devices
Nokia Lumia 930, bright display, wireless charging, 20 mega pixel camera with image stabilization. 4 (four) microphones in the device
630 and 635 with changable shells. 3G dual-sim capabilities. Can have phone tiles separated by sim, or mixed together. Even choose on a per-contact basis in the addresss book which SIM to use for calls. Will be sold starting in May with WP81 in Asia.
“Creative Studio” for editing on the phone.
Sensorcore is a low-power sensing technology for fitness tracking, SDK for motion-based location- and context-aware apps.
500 apps flow into the phone store each day.
Satya keynote
The entirety of the Windows family, from the Internet of things, consples, phones, tables and PCs. Not to forget the cloud.
Why build for Windows? Because we innovate with a challenger mindset.
What is the cross-platform story? WinJS, Phonegap, Xamarin
How does Microsoft compete in the tablez space? great devices, pricerange, apps,
How does UX change over the next 5 years? UX came long way. Today, we are design inspiration for other platforms and design. Bill Buxton says it is the context which needs to be considered. Wimdows hasnthe broadest interaction range, touch, mouse, keyboard, gesture, speech.
When mode data goes to the cloud, how can we deal with latency? 18 Azure regions, do stiff at the edge,mcaching, software-controlled networking, run geo distributed. Use Microsoft Azure Zraffic Manager.
How can Microsoft help Startups when they grow? Check BizSpark. Do community support. Accellerators on Berlin, Silicon Valley, Bejing. Seed funding.
Session 3-627: Azure AppFabric Controller Internals - Building and Updating High-Availability Apps (Igan Figlin)
Each rack has top of rack switch
Two fault domains are guatanteed by Azure.
Updates are user- or platform-initiated. Maximum is 20 update domains. First worker and first web role are on fist UD.
changing upate domain count for an existong service triggers rdeployment.
90% of customers do not use availability sets… #ouch
Do not (NOT) use single-instance availability sets. It just means you do not get update warning e-mails.
Right now, when the update notification for a singleton (single instance IaaS machine) comes in, proactively rebooting does not give you assurance that you reboot on an already updated machine.
IoT and Service Bus
IoT is new source of raw material
IoT extends customer engagement into the physical world.
transmuxed to Smooth, HLS, HDS, DASH, shown on Adobe Player Client
ZON, Nascar
“Office Video” is SharePoint using Windows Azure Media Services for Enterprise Video portals.
Going big with Windows Azure
Move from blocking to async/await is important, and for any real deployment saves real money.
Collapsing tiers
The new three-tier architecture is frontend, asynchronous backend processing and a couple of data services
“I don’t give you exact numbers, because we reserve the right to make it better.”
If SQL Azure has a connection limit of 180 connections, and ADO.NET has a pool of 100 connections, it takes 2 VMs with a bad app to max out the DB.
Erich Gamma on large JavaScript code base
While I understand that young JavaScript programmers do not see why they should use something like TypeScript, this presentation is a from-the-trenches eye-opener on why TypeScript makes much sense.
See also http://blogs.windows.com/windows/b/bloggingwindows/archive/2014/04/02/thoughts-on-day-1-of-build-2014.aspx
I did not find a quick and dirty example on how to use the Windows Azure Management Linrary (WAML) to change the number of instances for the different roles in a Windows Azure Cloud Service:
usingSystem;usingSystem.Linq;usingSystem.Security.Cryptography.X509Certificates;usingSystem.Xml.Linq;usingMicrosoft.WindowsAzure;usingMicrosoft.WindowsAzure.Management.Compute;usingMicrosoft.WindowsAzure.Management.Compute.Models;namespaceManageClienttest{classProgram{privatestaticX509Certificate2FindX509Certificate(stringmanagementCertThumbprint){X509Storestore=null;try{store=newX509Store(StoreName.My,StoreLocation.LocalMachine);store.Open(OpenFlags.ReadOnly|OpenFlags.OpenExistingOnly);X509Certificate2Collectioncerts=store.Certificates.Find(findType:X509FindType.FindByThumbprint,findValue:managementCertThumbprint,validOnly:false);if(certs.Count==0){returnnull;}returncerts[0];}finally{if(store!=null)store.Close();}}staticvoidMain(string[]args){varsubscriptionid="aaaaaaaa-bbbb-3443-5445-655678879889";varmanagementCertThumbprint="DEADBEEF12312327E649C41517FB13F09203035D";varservicename="thethingbeforecloudappnet";X509Certificate2managementCert=FindX509Certificate(managementCertThumbprint);SubscriptionCloudCredentialscreds=newCertificateCloudCredentials(subscriptionid,managementCert);ComputeManagementClientcomputeManagementClient=CloudContext.Clients.CreateComputeManagementClient(creds);vardetailed=computeManagementClient.HostedServices.GetDetailed(servicename);vardeployment=detailed.Deployments.First(_=>_.DeploymentSlot==DeploymentSlot.Production);varxConfig=XDocument.Parse(deployment.Configuration);Func<string,XName>n=(name)=>XName.Get(name,"http://schemas.microsoft.com/ServiceHosting/2008/10/ServiceConfiguration");Func<XDocument,string,int>getInstanceCount=(doc,rolename)=>{varrole=doc.Root.Elements(n("Role")).FirstOrDefault(_=>_.Attribute("name").Value==rolename);if(role==null)return-1;varv=role.Element(n("Instances")).Attribute("count").Value;returnint.Parse(v);};Action<XDocument,string,int>setInstanceCount=(doc,rolename,newInstanceCount)=>{if(newInstanceCount<1){newInstanceCount=1;}varrole=doc.Root.Elements(n("Role")).FirstOrDefault(_=>_.Attribute("name").Value==rolename);role.Element(n("Instances")).Attribute("count").Value=newInstanceCount.ToString();};Action<XDocument,string,int>changeInstanceCount=(doc,rolename,deltaCount)=>{intoldCount=getInstanceCount(doc,rolename);varnewCount=oldCount+deltaCount;setInstanceCount(doc,rolename,newCount);};changeInstanceCount(xConfig,"WorkerRoleA",2);// adds two instances to WorkerRoleA (scale-up) changeInstanceCount(xConfig,"WorkerRoleB",-5);// removes 5 instances from WorkerRoleB (scale-down)varresponse=computeManagementClient.Deployments.ChangeConfigurationBySlot(serviceName:detailed.ServiceName,deploymentSlot:deployment.DeploymentSlot,parameters:newDeploymentChangeConfigurationParameters(){Configuration=xConfig.ToString()});Console.WriteLine(response.StatusCode.ToString());Console.ReadLine();}}}
In your Azure Cloud Service’s OnStart() start-up code, you use the ServerManager class to modify your IIS settings. Some of your web role instances in the development fabric don’t come up and stay ‘unhealthy’. This article describes a possible cure for that.
Basically, if you use ServerManager in the development fabric, this post is for you.
Problem
In this article, I describe a solution to the problem where some of your Windows Azure web role instances in the development fabric get stuck in an unhealthy state, and thus do not start, when you use the ServerManager to tweak your Application Pool settings.
In our Windows Azure development project, we have a web role, which in turn has has multiple virtual applications (i.e. the CSDEF file contains many WebRole/Sites/Site/VirtualApplication elements). In our development environment, we use the ServerManager utility to change the identity under which the application pools run, so that they do not run under the “NETWORK SERVICE” account, but under a given user account (see Wade’s article for details). Assuming we deploy 5 web role instances, and each has 4 virtual applications, we have to modify the settings for 5*(1+4)=25 application pools (it’s 1+4, because in addition to the 4 virtual applications, we also need to we need to modify the actual web role itself).
The term ‘modifying a setting of an application pool’ means that you use the type Microsoft.Web.Administration.ServerManager (from %WINDIR%\System32\inetsrv\Microsoft.Web.Administration.dll) to modify the application pools, and then call the serverManager.CommitChanges() method. When running multiple instances in your Windows Azure development fabric, your RoleEntryPoint.OnStart() method potentially run in parallel with other RoleEntryPoint.OnStart(), and in the case of for ‘slow’-starting instances which are still being configured by the development fabric, you also run parallel to the fabric’s IisConfigurator.exe utility.
Why is that a problem? Well, in order to enact a configuration change, you need to call the serverManager.CommitChanges() method which essentially modifies a file in the local file system (namely “C:\Windows\system32\inetsrv\config\applicationHost.config”). And as you can imagine, this is the perfect opportunity for race conditions: Imagine a situation where one of your role instances (successfully) calls ServerManager.CommitChanges(), while the IisConfigurator.exe is in the process of configuring another role instance. Then IisConfigurator.exe fails to configure that other role (and crashes), that role is marked as ‘Unhealthy’ in the fabric and does not come off the ground. So, letting IisConfigurator.exe running into a race condition with your own code can ruin your day.
How the fix works
The CrossProcessBarrier
First of all, please keep in mind that this problem only occurs when running multiple web roles in the local development fabric. In a real deployment in a Windows Azure data center, your RoleEntryPoint.OnStart() is called after IisConfigurator.exe did it’s thing.
So on your laptop, you want to ensure that only one process at a time uses the ServerManager class. Your RoleEntryPoint.OnStart() code should run when IisConfigurator.exe has fully finished it’s business. So we ‘simply’ need to wait in the OnStart() code of each role, until …, yeah, hm, until when exactly? When all OnStart() methods are ‘at the same point’, that’s the right time when IisConfigurator is done.
In the Task Parallel Library, there is a nice construct called System.Threading.Barrier, which defines how many ‘participants’ should wait for each other, and when all participants reach the barrier, it releases them at once. Unfortunately, System.Threading.Barrier is for tasks and threads within the same process, and doesn’t work across different processes on Windows. So we need something that mimics a barrier, but uses Windows synchronization primitives which work across processes.
We developed a small utility type called CrossProcessBarrier. It uses global Mutex objects so synchronize across processes, and provides all we need. To enlist multiple participants in a cross-process barrier, we need some sort of identifier for each participant. Each participant needs to know the identifiers of the other participants. Based on these identifiers, each instance of the CrossProcessBarrier checks whether the others are already running (via a Mutex), and – once they all exist – releases the waiting thread. For a sample, see the unit test for the CrossProcessBarrier.
The ServerManagerBarrier
After having this cross-process synchronization primitive, the remaining step is to use that in our WebRole. The ServerManagerBarrier.ApplyServerManagerActions(Action a) method allows you to pass in an Action delegate in which you can safely apply the modifications you want to apply to IIS7. So that method (1) ensures you’re not trashing IIsConfigurator.exe, and (2) ensures your different web roles do not collide.
In this article, I describe how to run a Perl script in a Windows Azure worker instance. One of our partners in our e-Science research project VENUS-C heavily relies on Perl for scientific computations, so I was curious to see through how many hoops I would have to jump to get this going. I did not need any advanced Kung-Fu, it just worked out of the box. Problem solved.
#The quick facts
Simply speaking, your Azure worker needs to do the following:
In your OnStart() method, download and ‘install’ Perl
By shipping it with your .cspack file, or
by dynamically downloading it from a well-known location and
Unzipping it to a local resource folder.
Launch Perl with your script ◾Make sure your ProcessStartInfo.EnvironmentVariables[“Path”] contains the subdirectories “perl\site\bin”, “perl\bin” and “c\bin”
If necessary, grab the script’s stdout/stderr output.
#The long explanation
##Which Perl
When looking for an up-to-date Perl distribution for Windows, I stumbled across Strawberry Perl (http://strawberryperl.com/). This distribution comes in two flavors: an MSI installer and a ‘portable’ version. The MSI installer is useful for a clean install/uninstall on your regular Windows box where you are the administrator. The portable installation, which is a 55MB ZIP file, is suitable for environments where you cannot run an installer, such as Windows Azure, where you currently (as of August 2010) have no administrative privileges. I did not try other Perl distributions, but the process described here should apply to others as well. Anyway, get a ‘portable’, i.e. an XCopy-deployable version.
##Deploying Perl
###Downloading
To get the Perl binaries onto your worker instance, you basically have two options: You can either ship your binaries as part of your published cloud service, or you fetch Perl when your role starts. Including the Perl ZIP file as a resource in your worker role has the advantage that you have a self-contained package without any moving parts. In the sample attached to this article, the worker role downloads and extracts the Perl distribution in the OnStart() method. A configuration setting lists alternative download locations, such as a fast and cheap CDN location and the fallback on the master site. Alternatively, you can store such a pre-requisite for your worker role in Azure blob storage.
The local copy of the Perl ZIP file then needs to be unpacked, for example using the Ionic.Zip.dll from CodePlex. The unpacked Perl distribution has a size of ca. 190MB, so reserving local storage of 250MB sounds reasonable.
When you look at the Perl distribution, it ships with a file called ‘portableshell.bat’. The main thing it does is that it adds the appropriate folders to the Path environment variable. The following subfolders need to be in the path:
When launching Perl, you use the executable in “perl\bin\perl.exe”.
Given that your script is running at a remote location (in a Microsoft data center), you need to ensure that you capture the output (stdout / stderr) of the script. In the code snippet below, I’m just tracing it into Azure diagnostics.
What you should take away from this article is that running Perl on the Azure is a very straightforward experience: get and install Perl, setup the execution environment for your process, and here you go… Just launch Perl.
I noticed that Jason’s and Justin’s blog entries refer to an old location at http://wcf.netfx3.com that seem to be down. I copied my old code to GitHub.
A colleague asked me about XML Signature, and I just remenbered that my old Ph.D. thesis (“Confidentiality of XML documents by pool encryption”) is online, which contains (besides theoretical nonsense) a nice introduction to XML Signature in chapter 4.2…
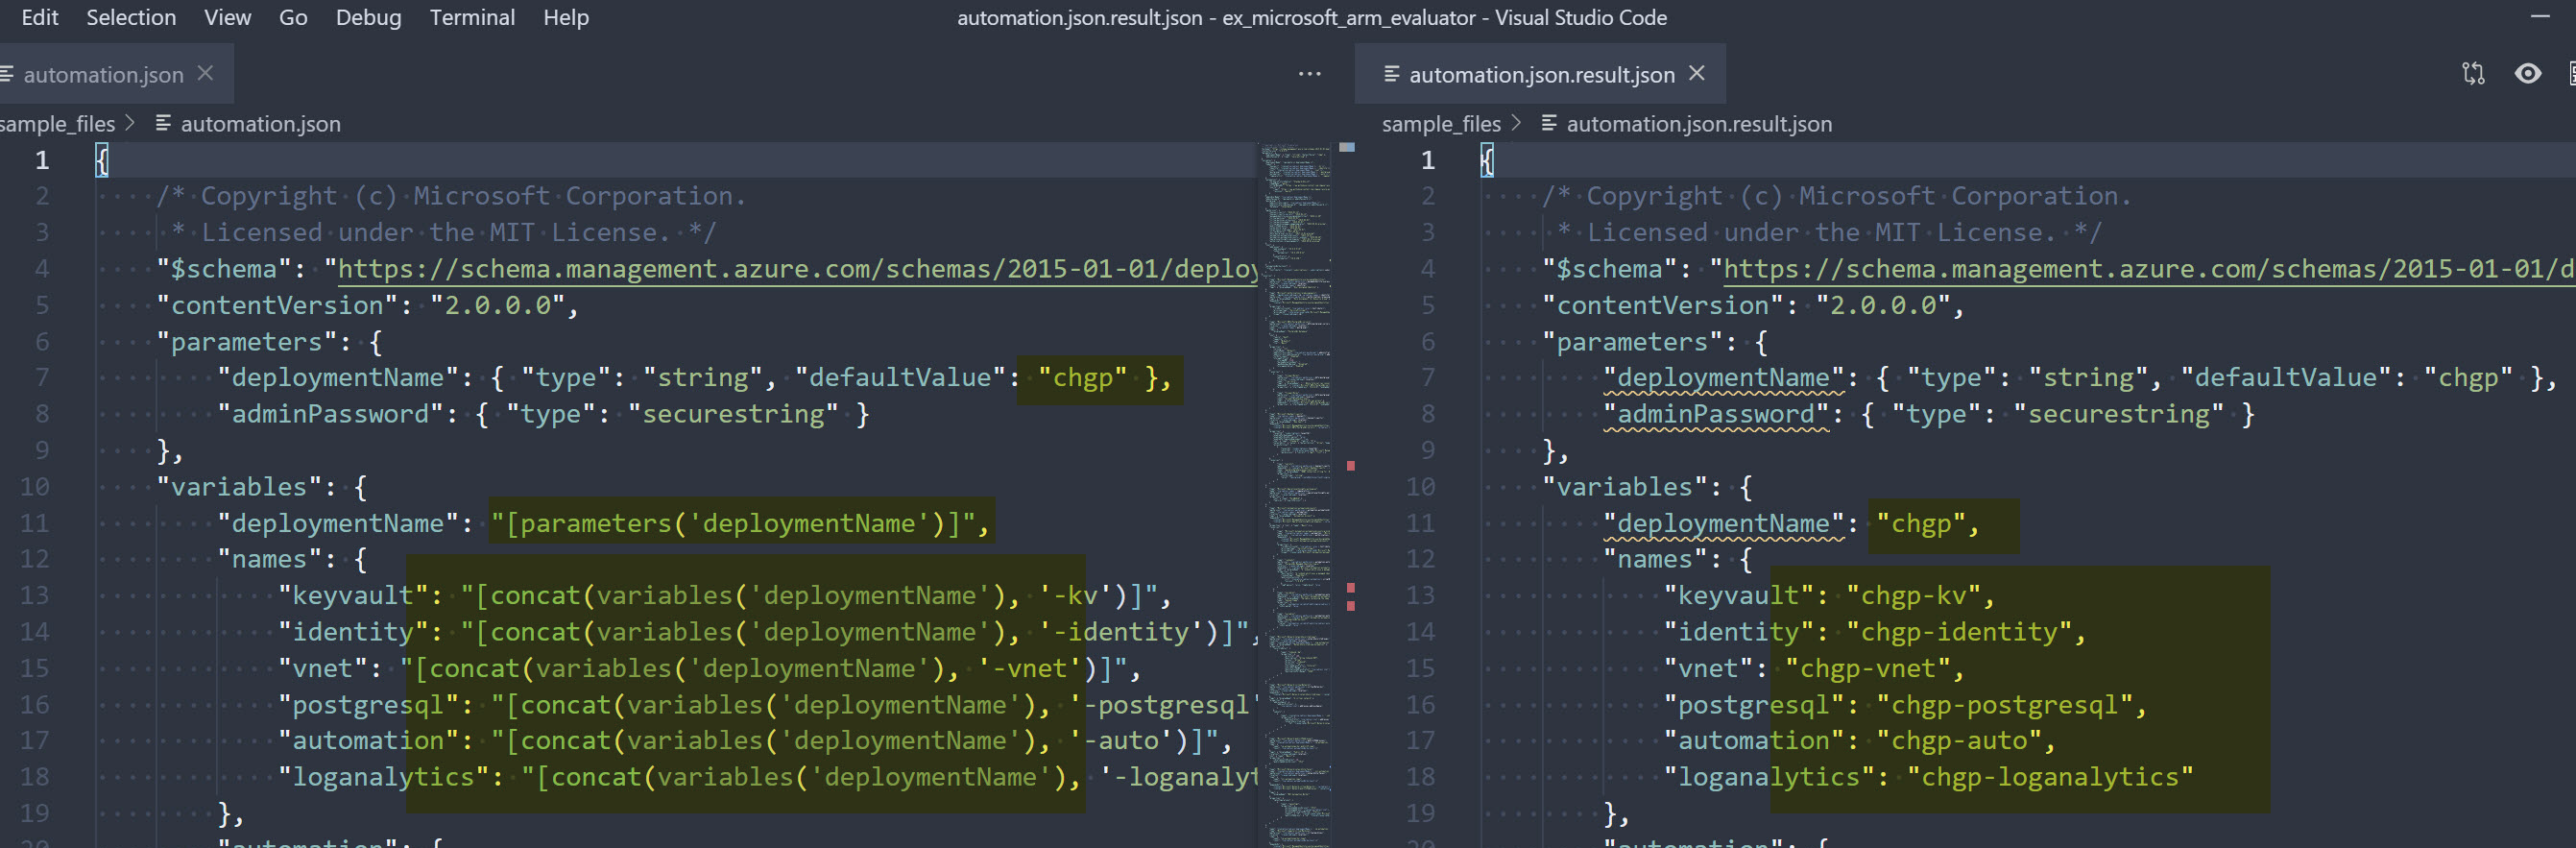
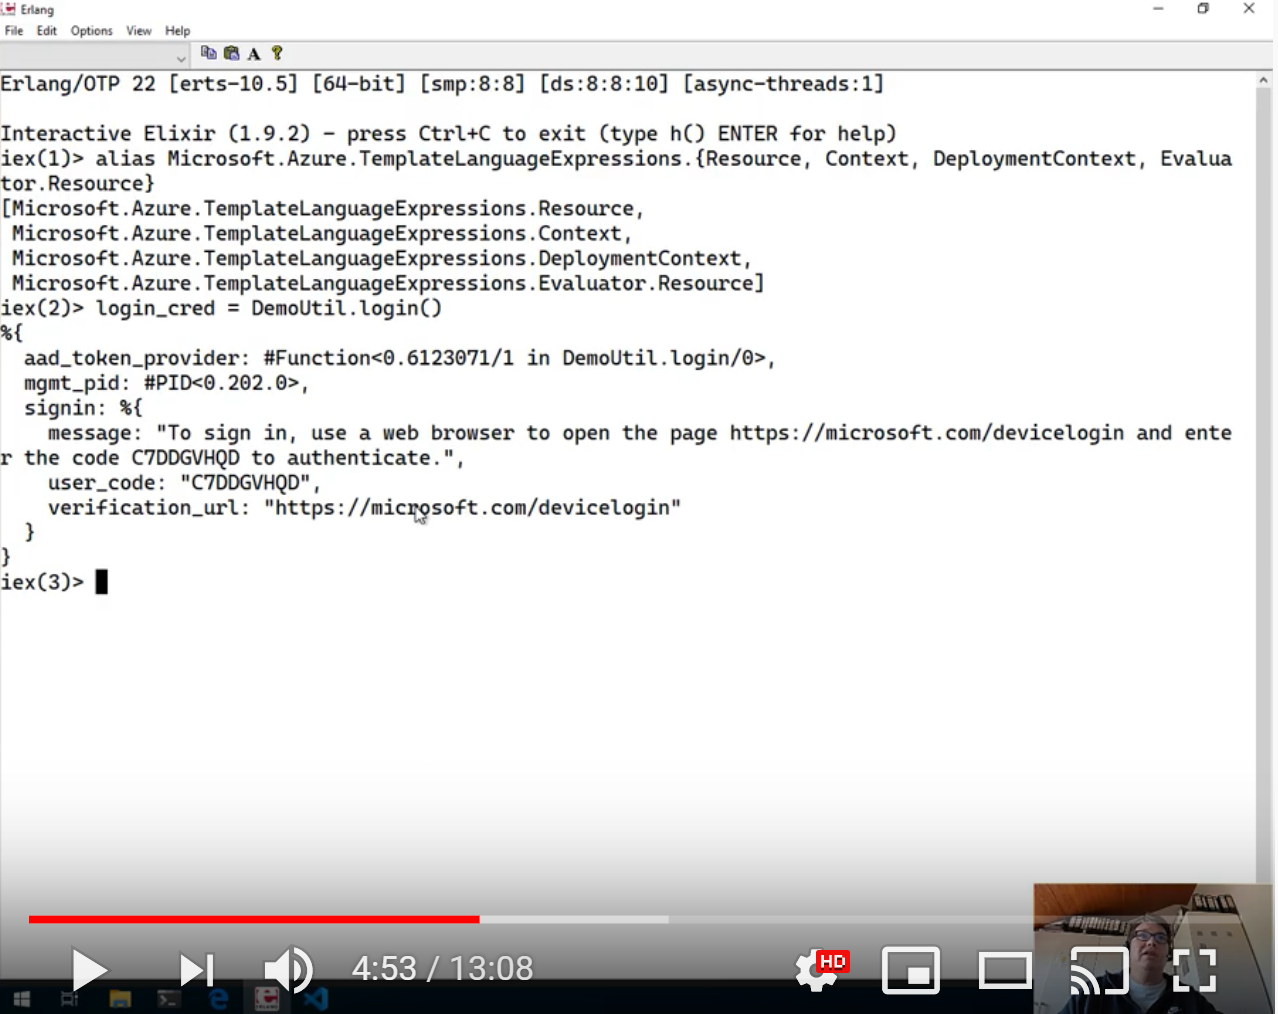


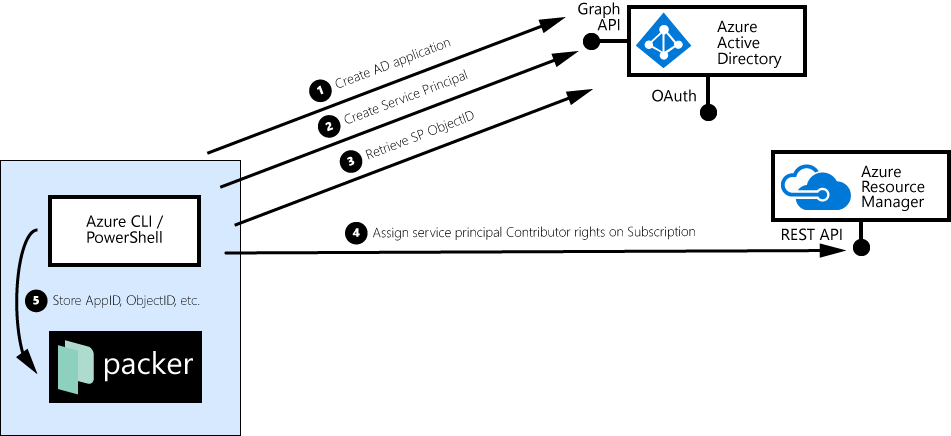
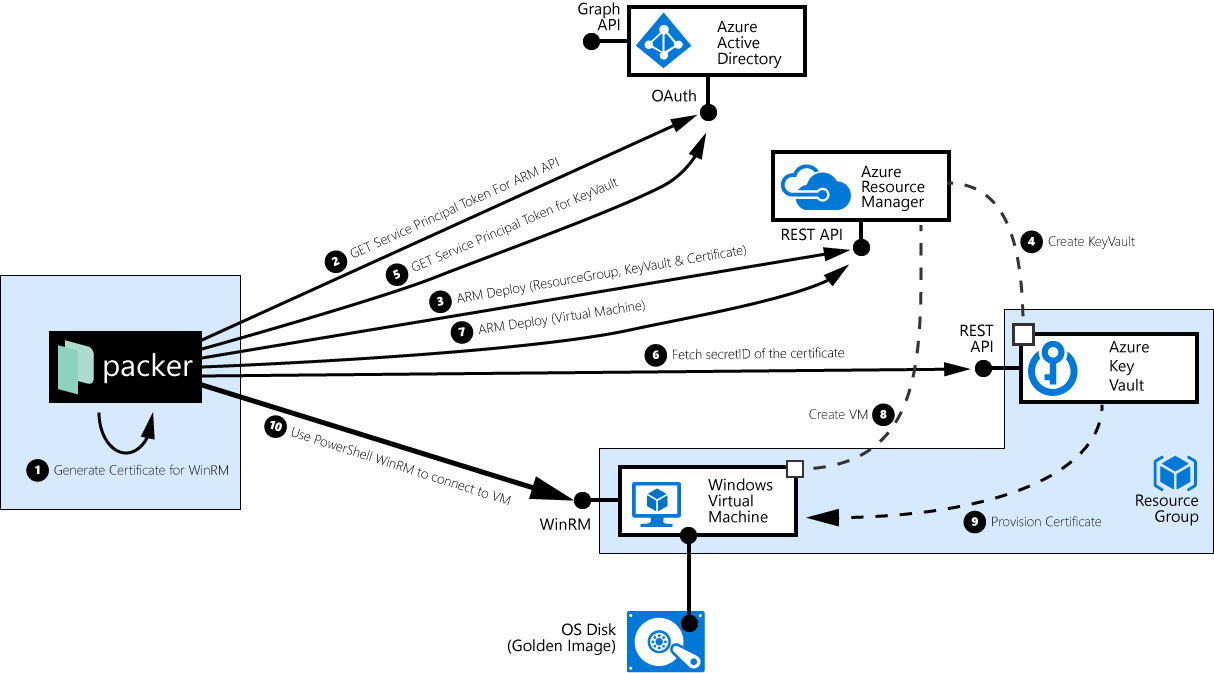


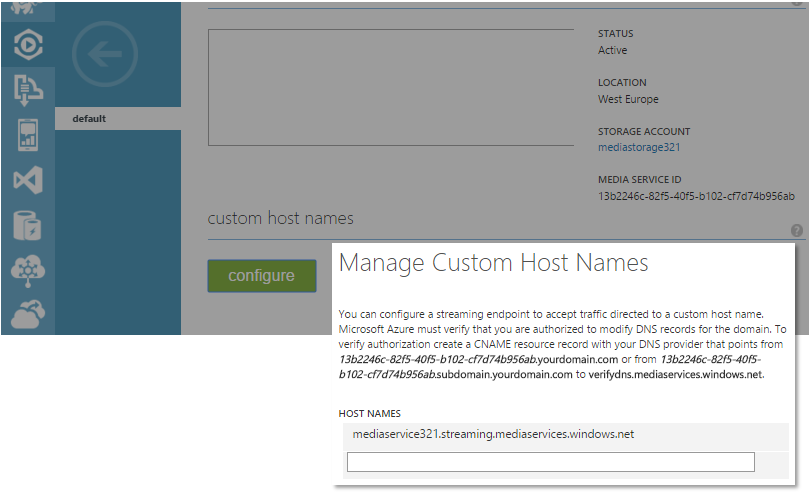 </img>
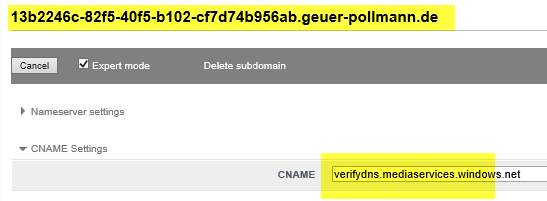 </img>
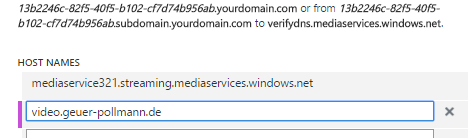 </img>
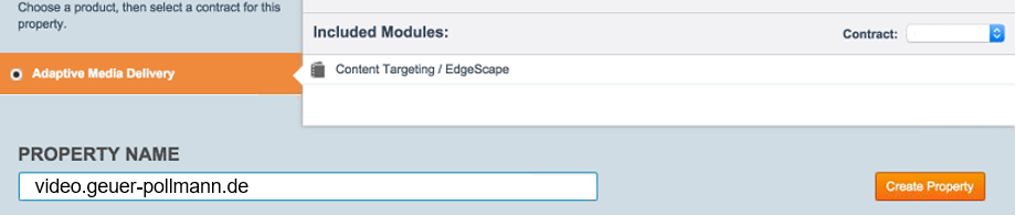 </img>
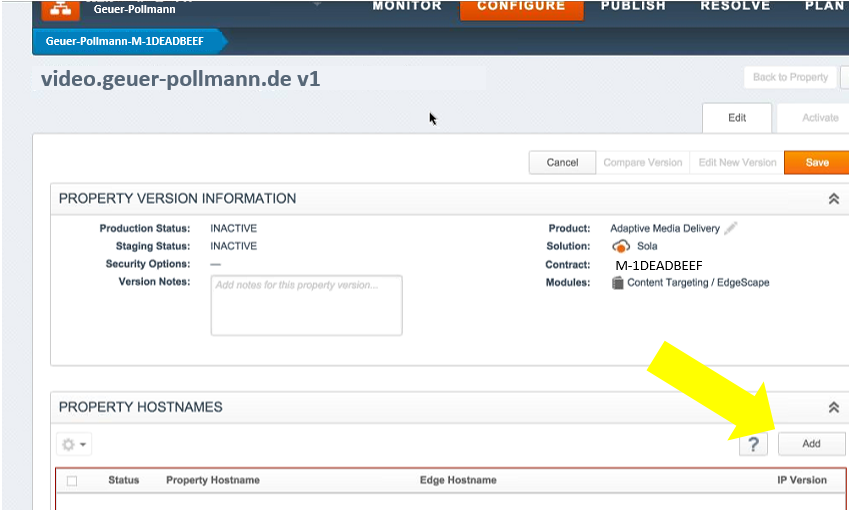 </img>
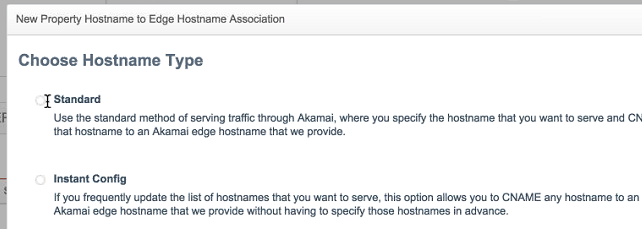 </img>
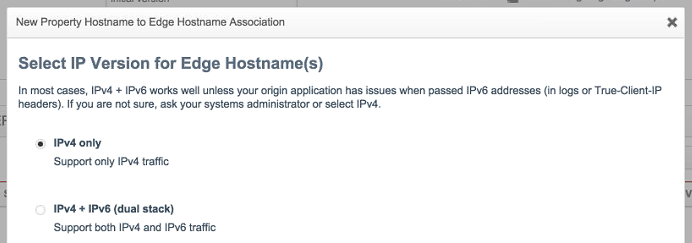 </img>
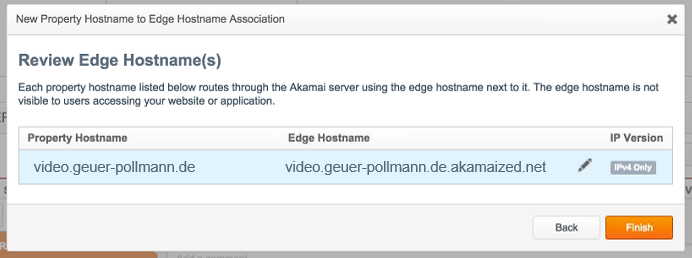 </img>
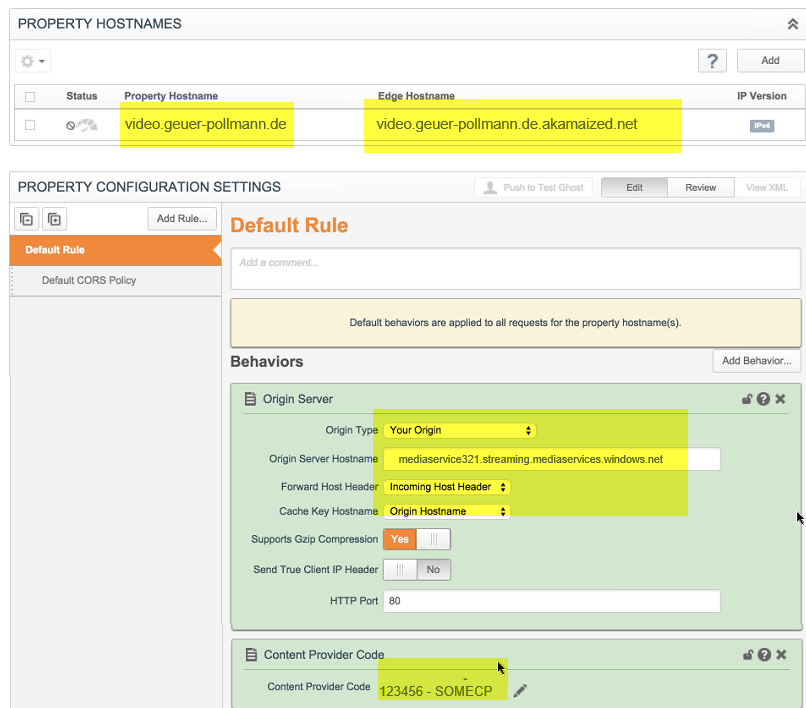 </img>
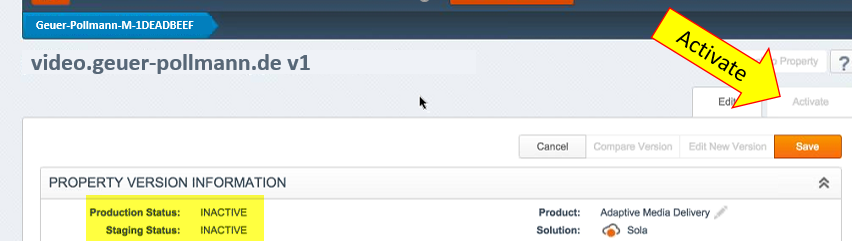 </img>
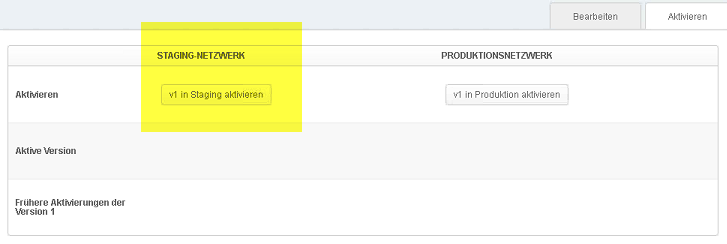 </img>


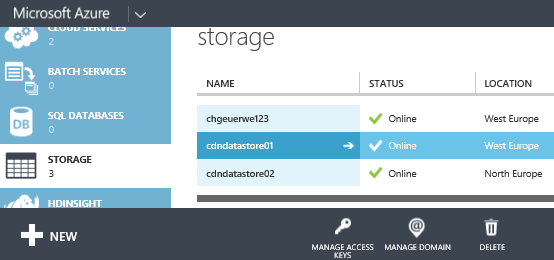

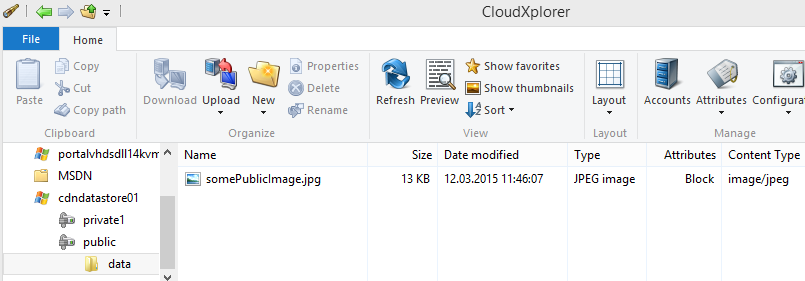

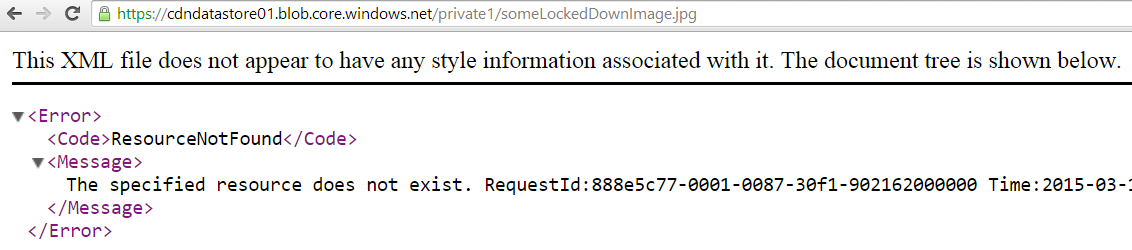

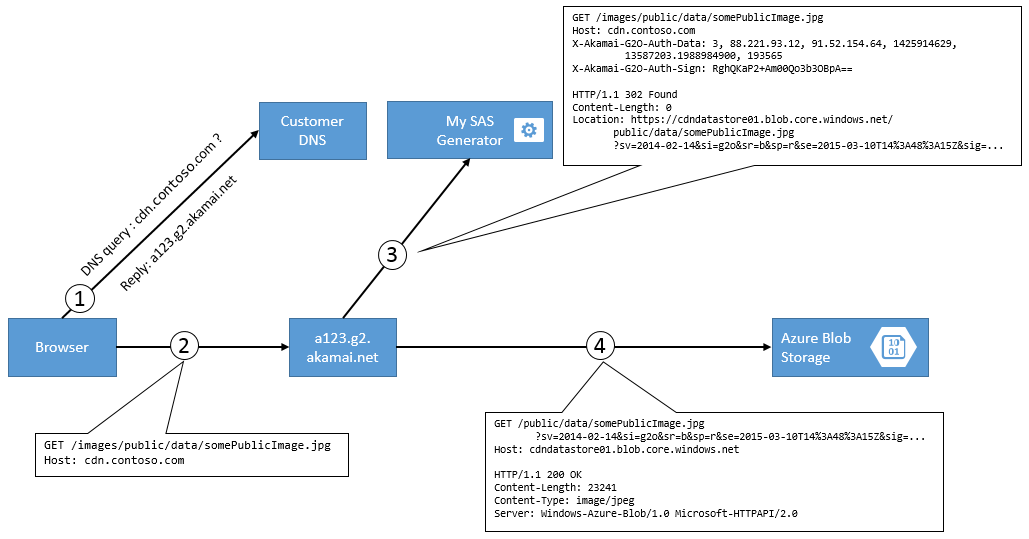 </img>
 </img>
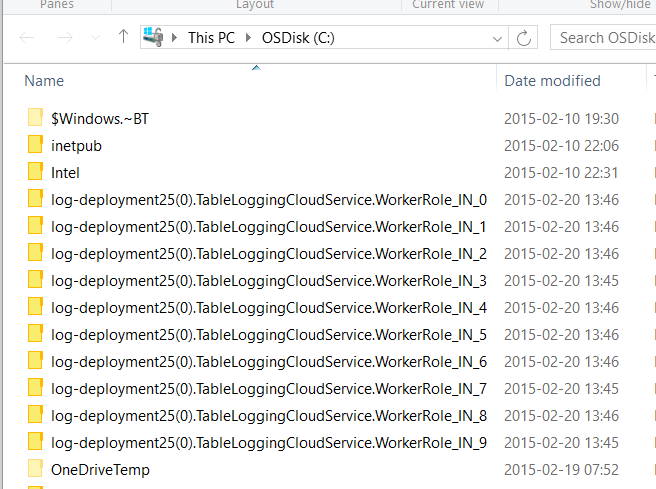 </img>
 </img>